
AWS CloudFront is a service that allows system administrators to deploy content across the globe. Before we dive into the technical aspects of AWS CloudFront, it’s important to have a fundamental understanding why it matters and what problem it solves for the end user.
AWS CloudFront is what’s called a Content Delivery Network, or CDN. As mentioned above, the objective of a CDN is to deliver content to the user. This is important as it reduces the latency for the end-user and thus improves the experience. From a practical standpoint, the content resides at a central location, and is services through edge nodes that cache the content. In general, the user doesn’t care if they’ve received the content from the source location, or from the edge.
Key Takeaways on AWS CloudFront
- AWS CloudFront is a Content Delivery Network that provides users with faster access to files.
- AWS CloudFront uses local servers called “edge locations” to cache files and deliver them from those locations to the end-users.
- AWS CloudFront edge locations retrieve files from the main server, use cache policies to store the files, and services them to end-users that are nearby.
- Cloud administrators create the distribution policies that optimize the way in which files are sent to edge locations in order to create the best user experience by reducing the perceived latency of retrieval.
A Practical Example of AWS CloudFront
Let’s imagine that we’re a media company that creates digital journals on a variety of topics. These journals are delivered to the users via a standard website. The users can navigate between different sections of the digital journal and focus on their topics of interest. The company resides in San Francisco with the majority of readers in the US, a smaller percentage in Europe, and some in Asia.
The company has purchased AWS services in the US-West region and has been delivering content to the reads without any issues. However, the EU and Asia subscribers have began to complain about the “lag” when navigating between pages - users are noticing that when they navigate to a new page, it can take a few seconds to load their content.
This is where a CDN or AWS CloudFront comes in!
The system admin team can keep their content within the US-West region, and deploy AWS CloudFront to the EU and Asia locations. This will create a link that will duplicate the content in those regions and allow the users to retrieve it directly from those datacenters. By doing so, they’ll significantly reduce the time it takes to load the pages.
What are the Immediate Tradeofs of a CDN?
In the scenario above, system administrators are subjected to a few tradeoffs:
- There’s a delay between the synchronization of the main content location and the nodes. In other words, if the content is of critical nature, there’s going to be a delay between the time US-West and EU users will receive it.
- There’s cost associated with servicing content across different regions. Without this distribution schema, the provider doesn’t need to pay for the ressources to run and maintain the delivery network.
Hands On Lab Using AWS CloudFront
In this section, we’ll get started with AWS CloudFront. Per our discussion above, we need to create a content bucket in order to deploy it onto edge nodes.
Step 1 - Navigate to the CloudFront Console
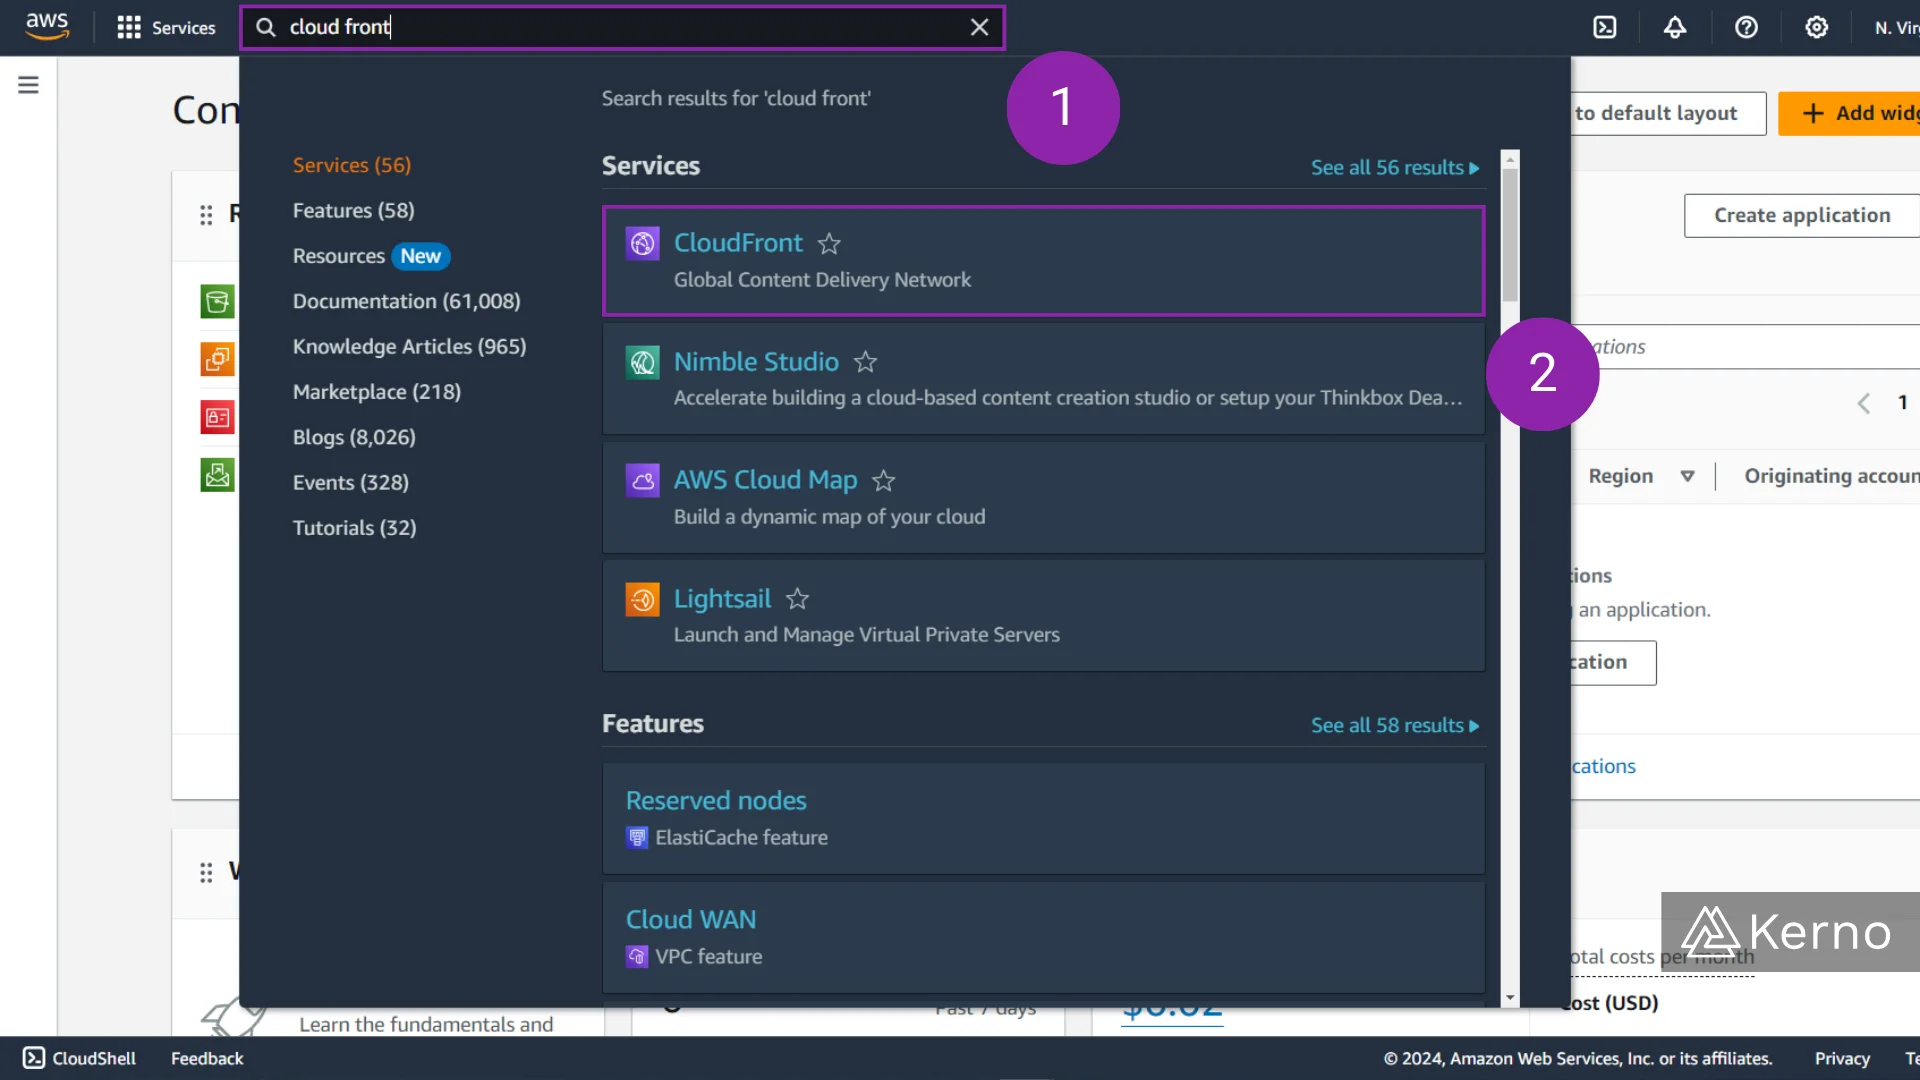
1.1 - From the AWS Console, search for “CloudFront.”
1.2 - From the drop-down menu, click on “CloudFront.”
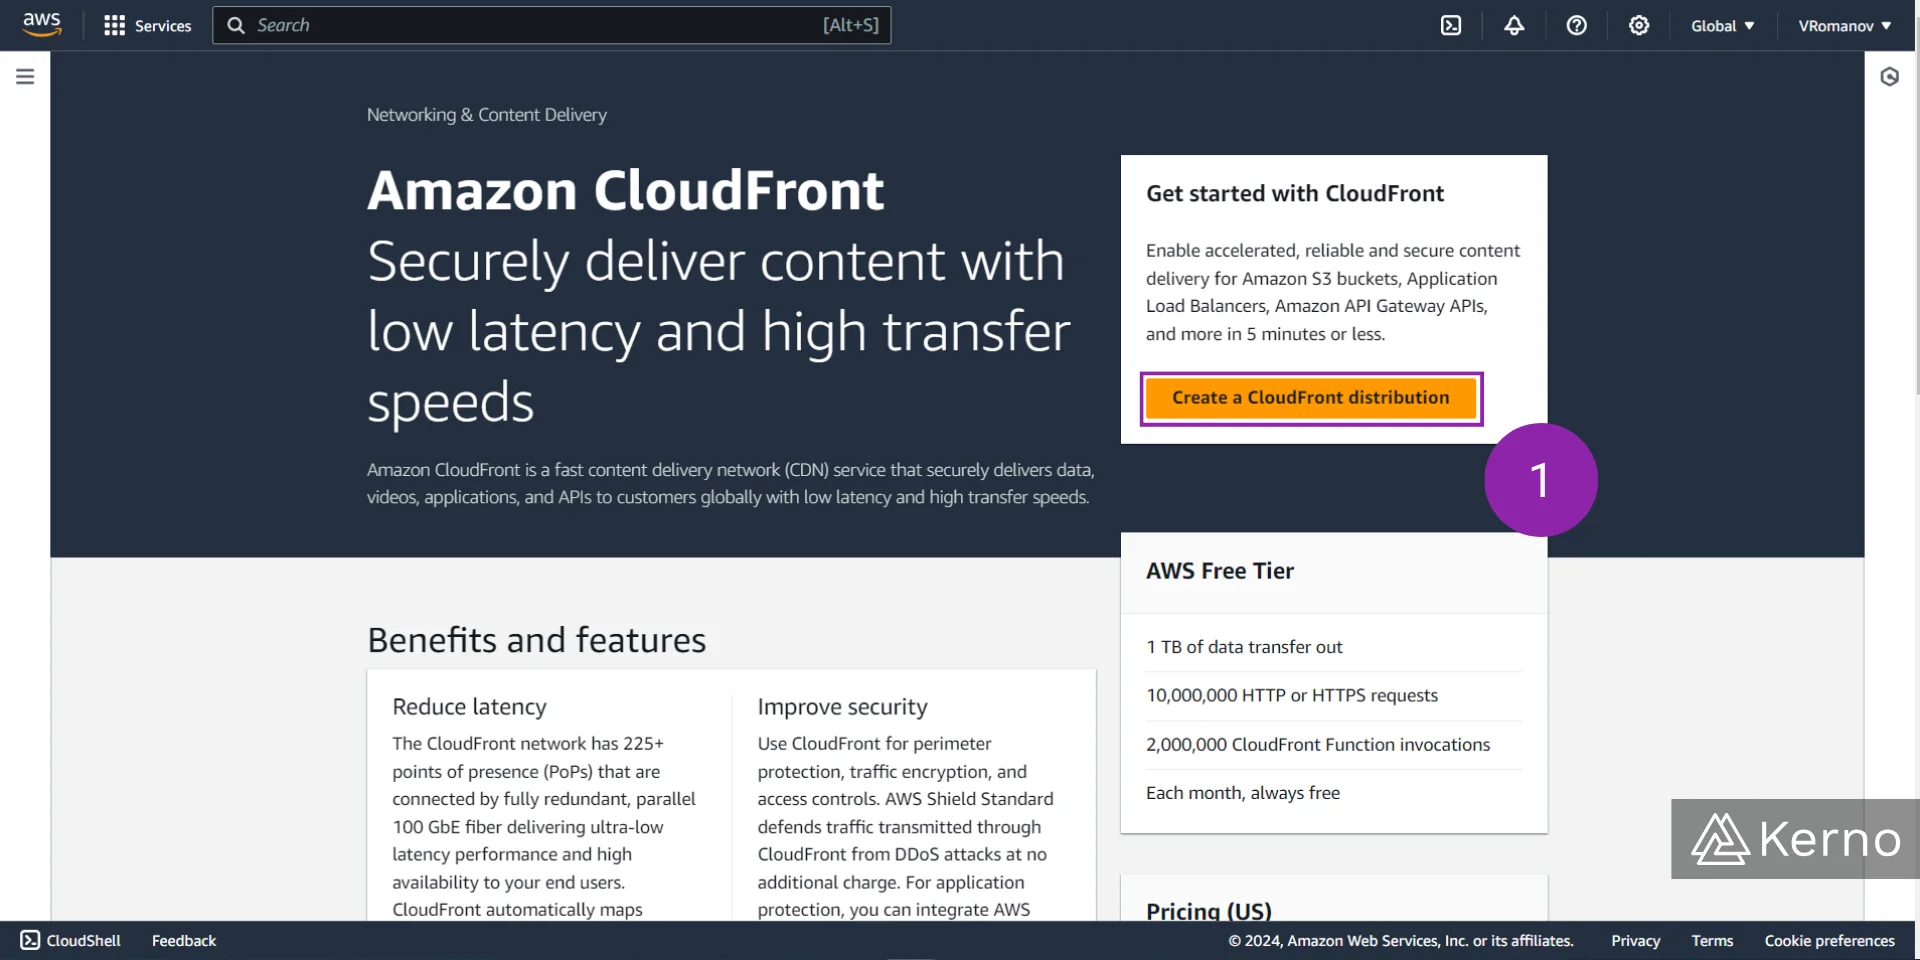
Step 2 - Create a CloudFront Distribution
2.1 - From the AWS CloudFront Console, click on “Create a CloudFront distribution.”
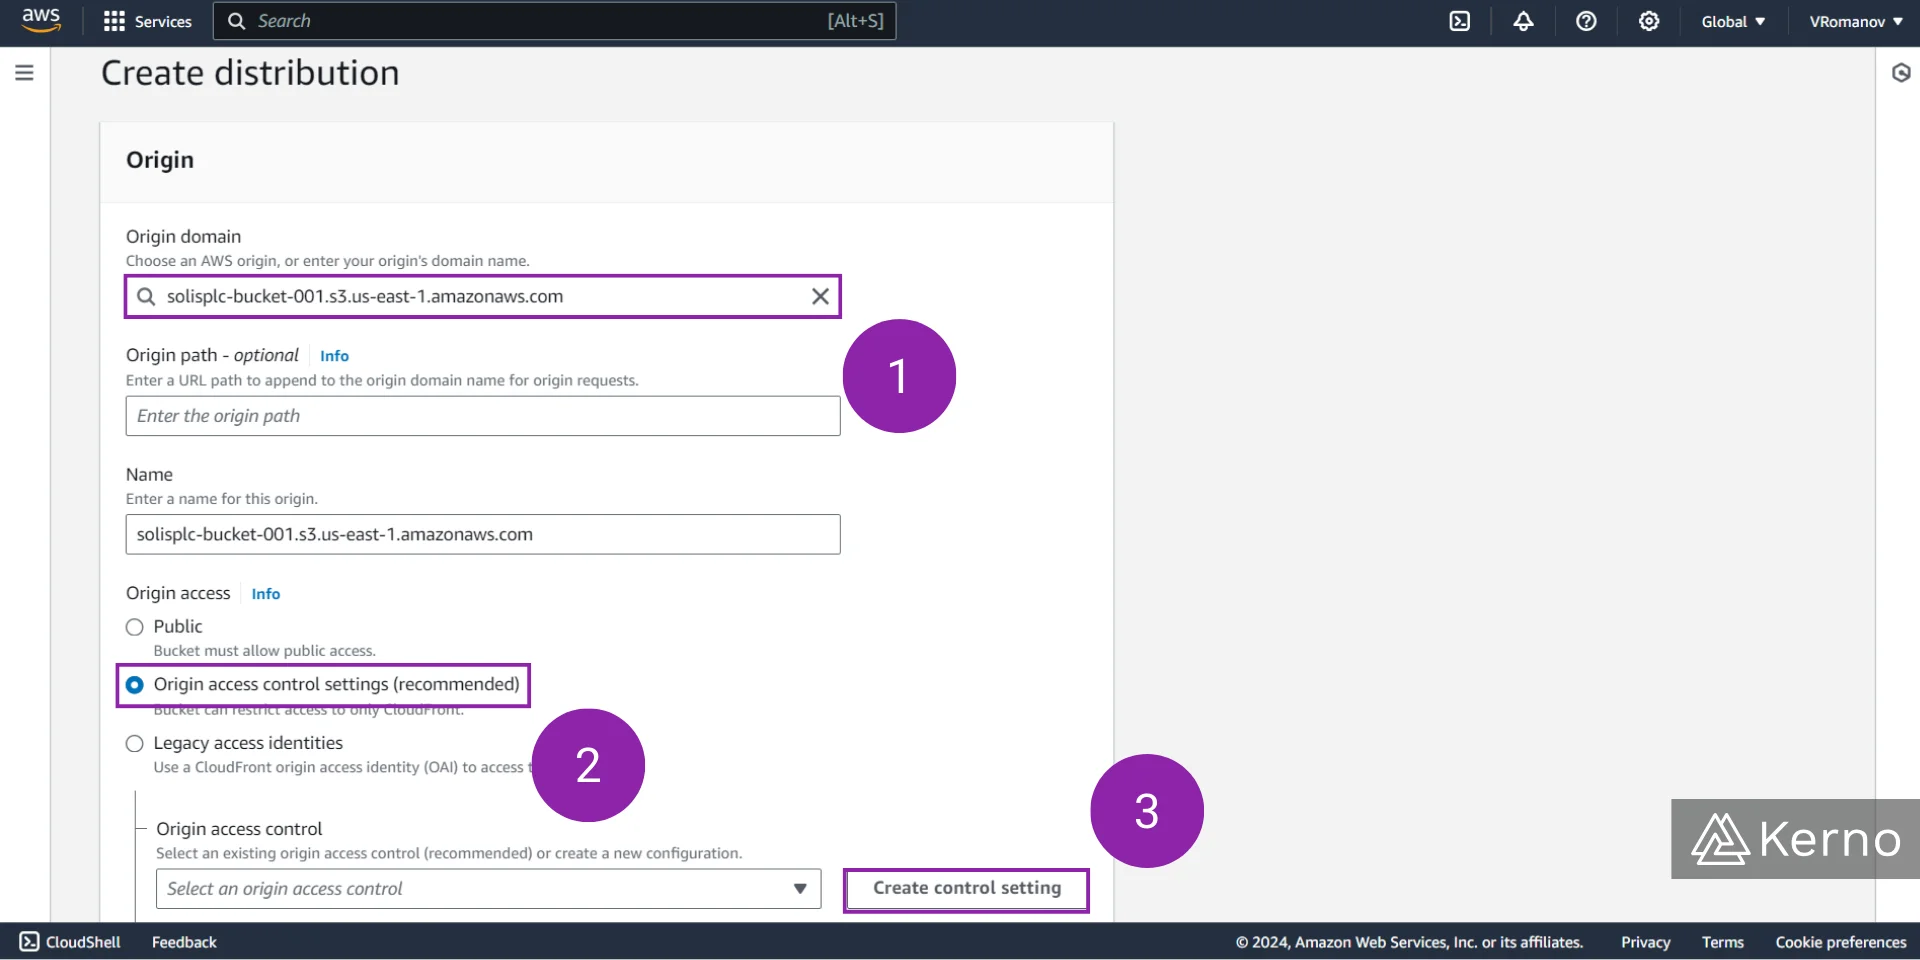
Step 3 - Specify the Settings for the CloudFront Distribution
3.1 - In the “Origin domain” field, you’re asked to select the asset you intend to distribute. This can be a variety of different items we’ll discuss later in this tutorial. In this example, we’ll use an S3 bucket.
3.2 - From the “Origin access” list, you can choose how your asset will be accessed. The “Public” option will expose it to the entire web, while the “Origin access control settings” will allow you to inherit some of the options selected for the bucket. We recommend this option.
3.3 - If you choose “Origin access control settings” in step 3.2, you’ll be prompted to create a control setting. Press on “Create control setting.”
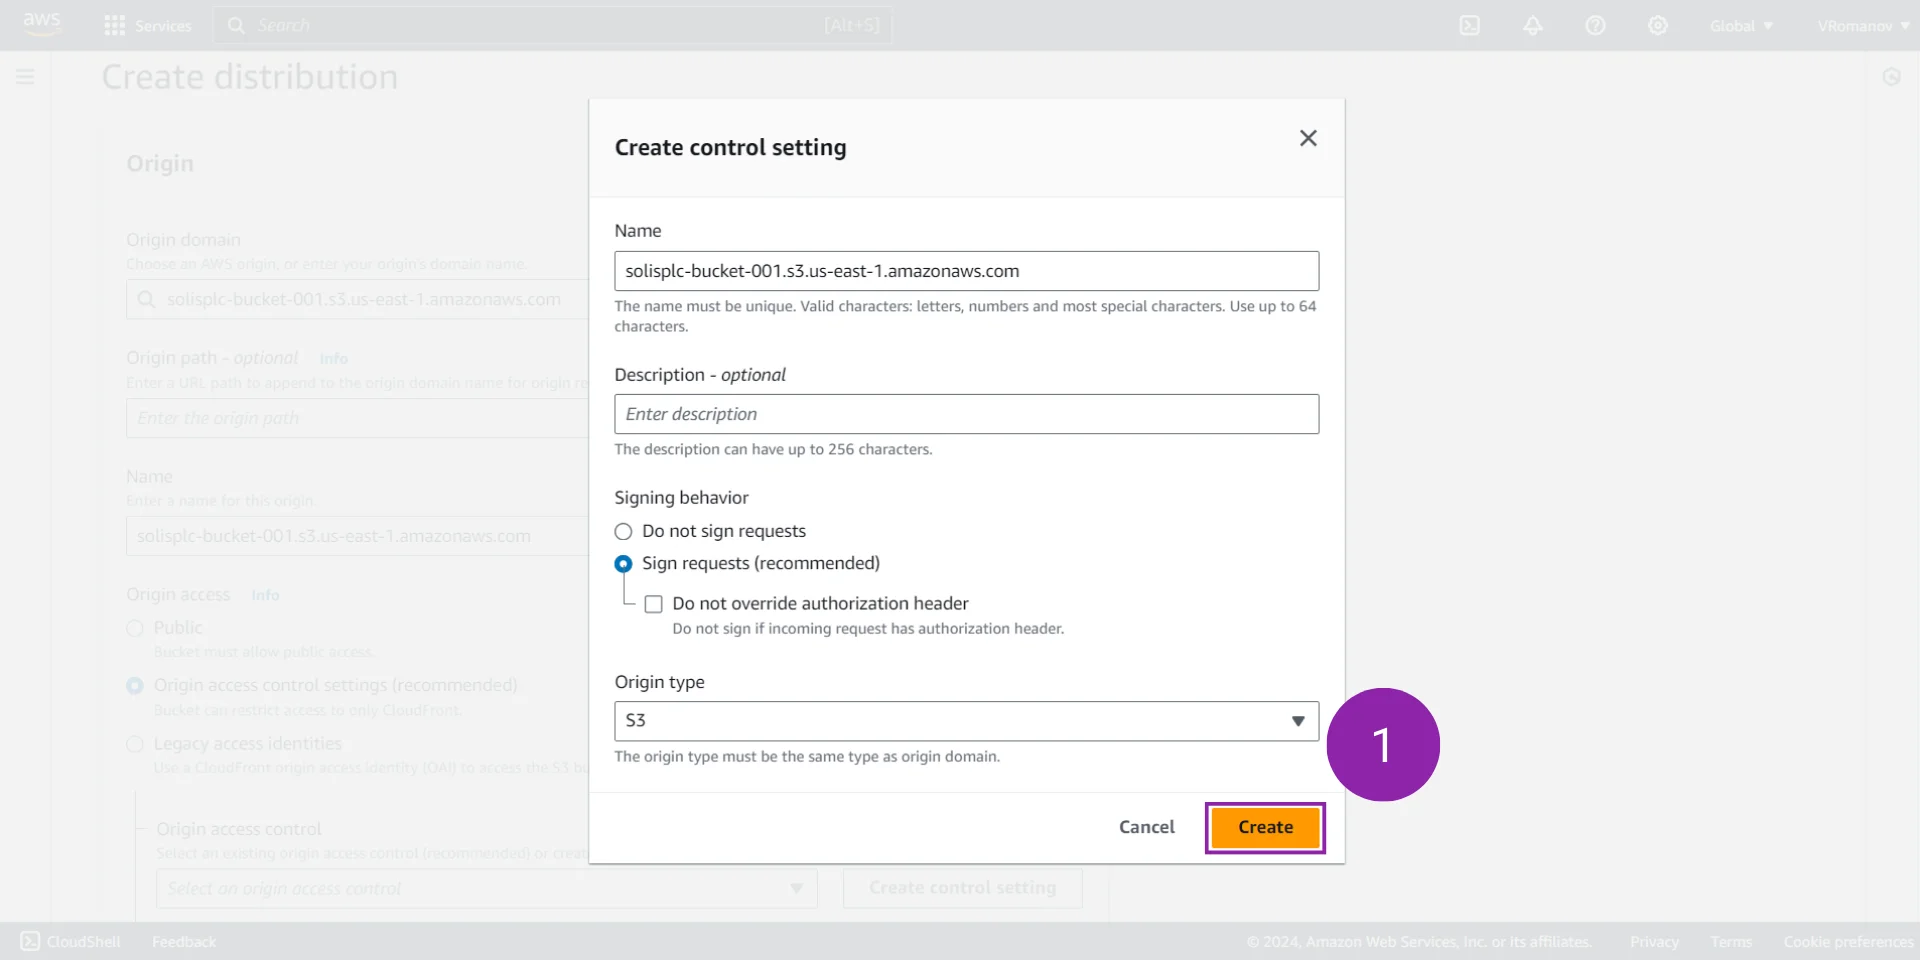
Step 4 - Confirm the Settings for CloudFront Control
4.1 - If you’ve followed the instructions in Step 3 above, you’ll be presented with the options to specify for control settings. AWS will automatically detect that you’ve selected S3. In this case, we’re going to accept the default settings by pressing “Create.”
Step 5 - Specify the Settings for the CloudFront Distribution
5.1 - Under the “Web Application Firewall (WAF)” section, we’re going to choose “Do not enable security protections.”
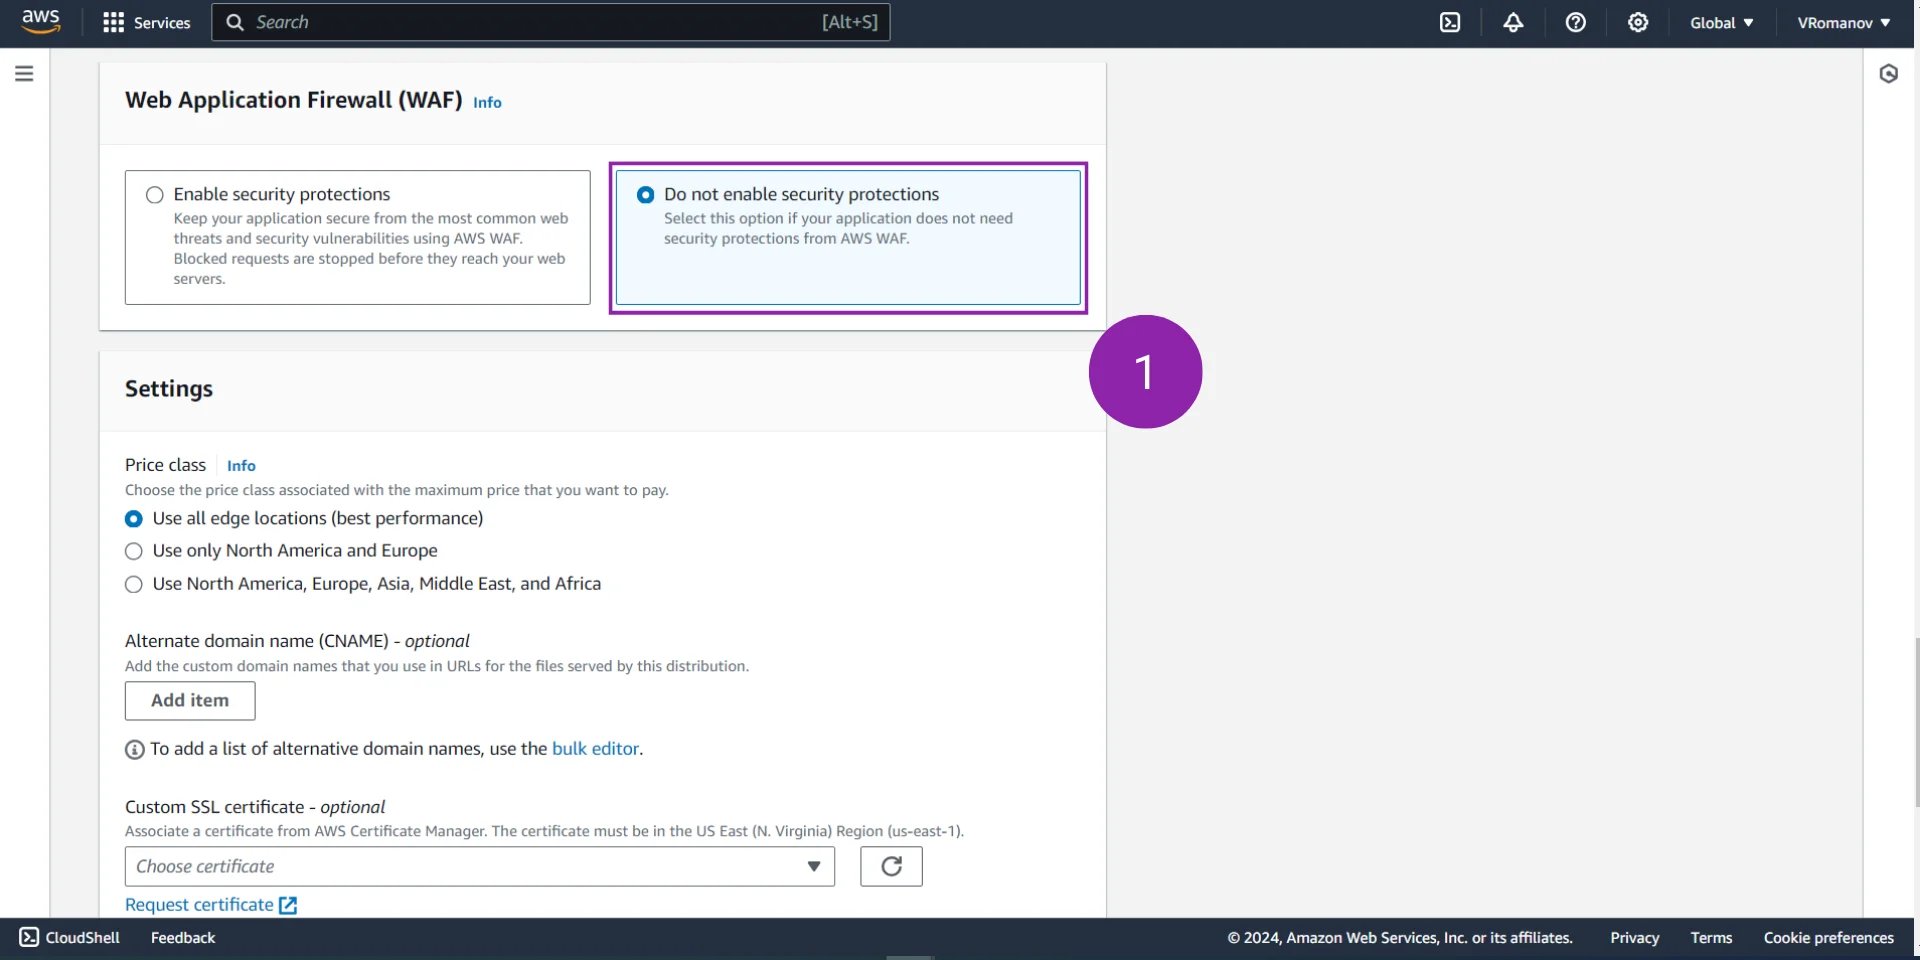
5.2 - Under the “Default root object” select the file you’d like the CloudFront edge service to point to. Note that on our bucket, we have an index page that displays the IP address of the location for testing purposes.
5.3 - At the bottom of the page, click on “Create distribution” to finalize the creation process.

Updating S3 Bucket for AWS CloudFront
In the previous section, we’ve created an AWS CloudFront deployment. However, it’s important to note that we didn’t update the policies of our bucket as it was mentioned in the settings section. The warning to update the policies of the bucket will also be displayed when the user is brough back to the main page after completing the creation process. Let’s go through the steps to update the policy of the appropriate S3 bucket.
Step 1 - Copy the Policy from CloudFront
1.1 - From the alert bar, click on the “Copy policy” button.
1.2 - From the alert bar, click on the “Go to S3 Bucket permissions to update policy” button.

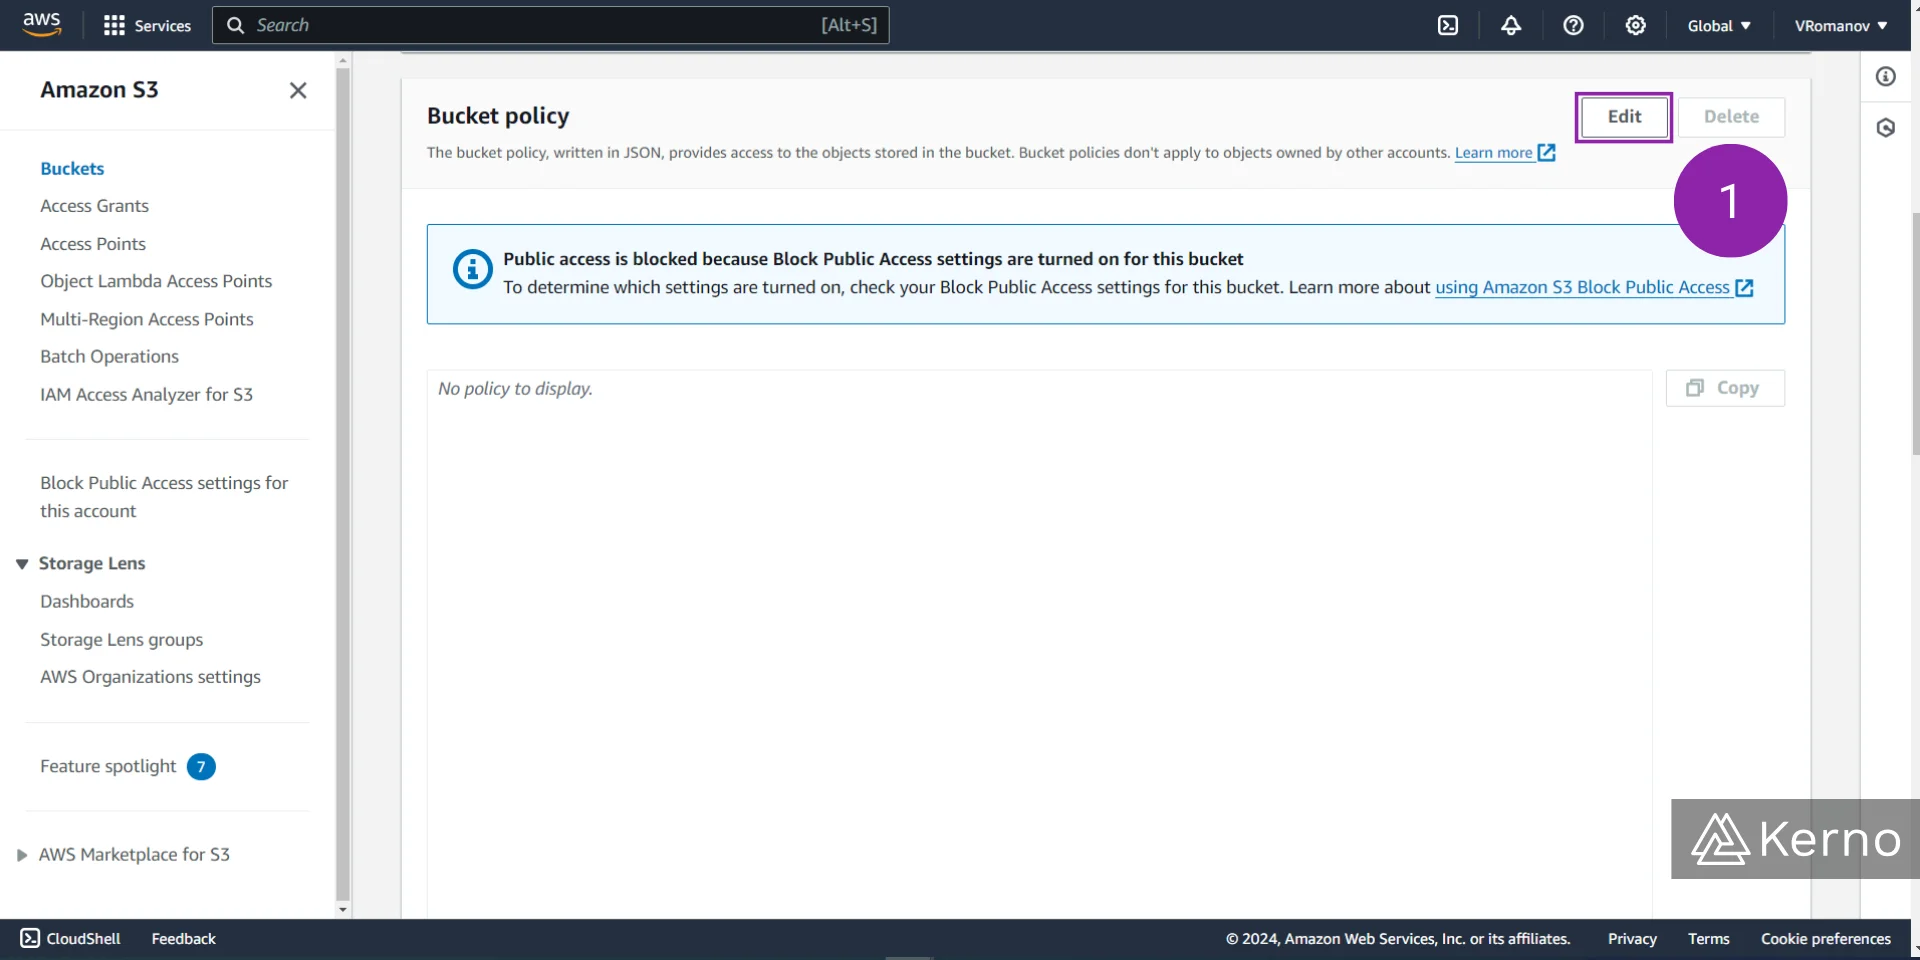
Step 2 - Add Policy to S3 Bucket
2.1 - Scroll down to the “Bucket policy” section and click on “Edit.”
2.2 - Paste the policy we copied in step 1.1 above.
2.3 - Confirm the policy, by pressing the “Save changes” button at the bottom of the page.
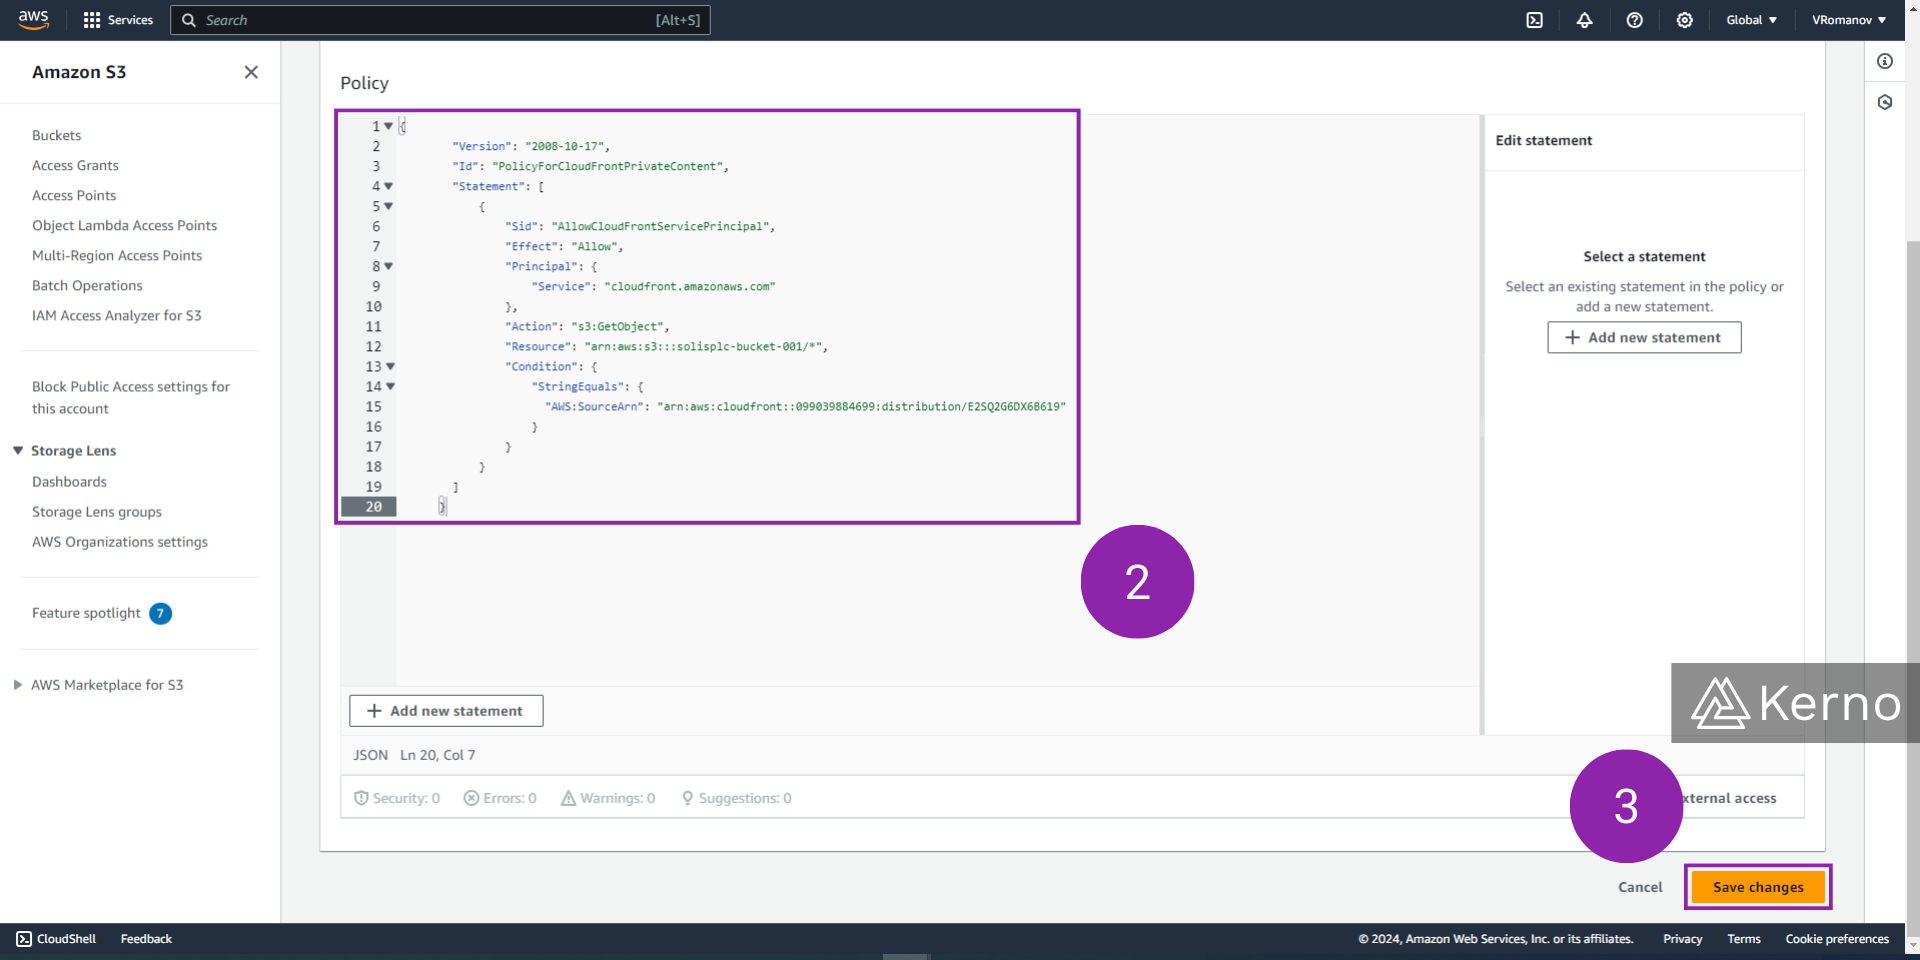
At this point, the policy of the bucket should match what is expected on the CloudFront side.
Understanding AWS CloudFront Edge Caching & Policies
As we discussed throughout the tutorial, the way CloudFront serves content is through edge devices / locations. Now that we have a fundamental understanding of how CloudFront operates, let’s discuss the principles of caching and caching policies.
The general flow of information will proceed as follows:
- The client establishes a connection to the server at the closest location.
- If the client is close to the main distribution, he will be served the content directly from the S3 bucket (or via other asset).
- If the client is close to an edge location that is services by CloudFront, the CloudFront edge application will verify if a cached version of the asset is available.
- If a cached version of the asset is available at the edge location, it will be forwarded to the client.
- If a cached version of the asset is unavailable, the edge location will issue the request to the main distribution server.
- If an edge location makes a request to the main distribution server, the asset will be sent to the edge location, and the client. The edge location will update the asset and store it in cache.
Based on the steps above, it’s important to note that there are instances where the first client that accesses an asset will be served that asset slower; the subsequent clients will have access to the asset from the edge location.
AWS CloudFront Cache Key
A Cache Key is assigned to every object that is stored at an edge location. This is a unique identifier that calls out the object, the version of the object, and the time it was created. By default, a cache key will consist of the hostname and the resource portion of the URL. This is typically sufficient for basic applications and test scenarios, but it’s important to note that objects can be delivered to different devices, different types of users, have variations that may not require caching, and more. In other words, the default schema may not be optimal in every instance which requires the user to be familiar with setting cache policies for the specific use case.
Within CloudFront, you can cache based on the following:
- HTTP Headers: None | Whitelist
- Cookies: None | whitelist | Include All-Except | All
- Query Strings: None | Whitelist | Include All-Except | All
You can also choose to create a custom policy, or use Predefined Managed Policies.
Note that all the HTTP headers, cookies, and query strings that you use in the Cache Key will be automatically appended to the origin requests.
Conclusion on AWS CloudFront
CloudFront is a key AWS service when it comes to content distribution. By creating a better user experience, application developers can improve their ratings, retain users, and ensure a seamless experience of their platform. CloudFront leverages edge locations that store a cached version of the asset the main version of which resides on the main server. System administrators can specify different policies that dictate how the files flow between the main server, edge locations, and end-users. These settings will differ between use cases and will otimize spend, asset availability, and user experience.