
Introduction to AWS VPC
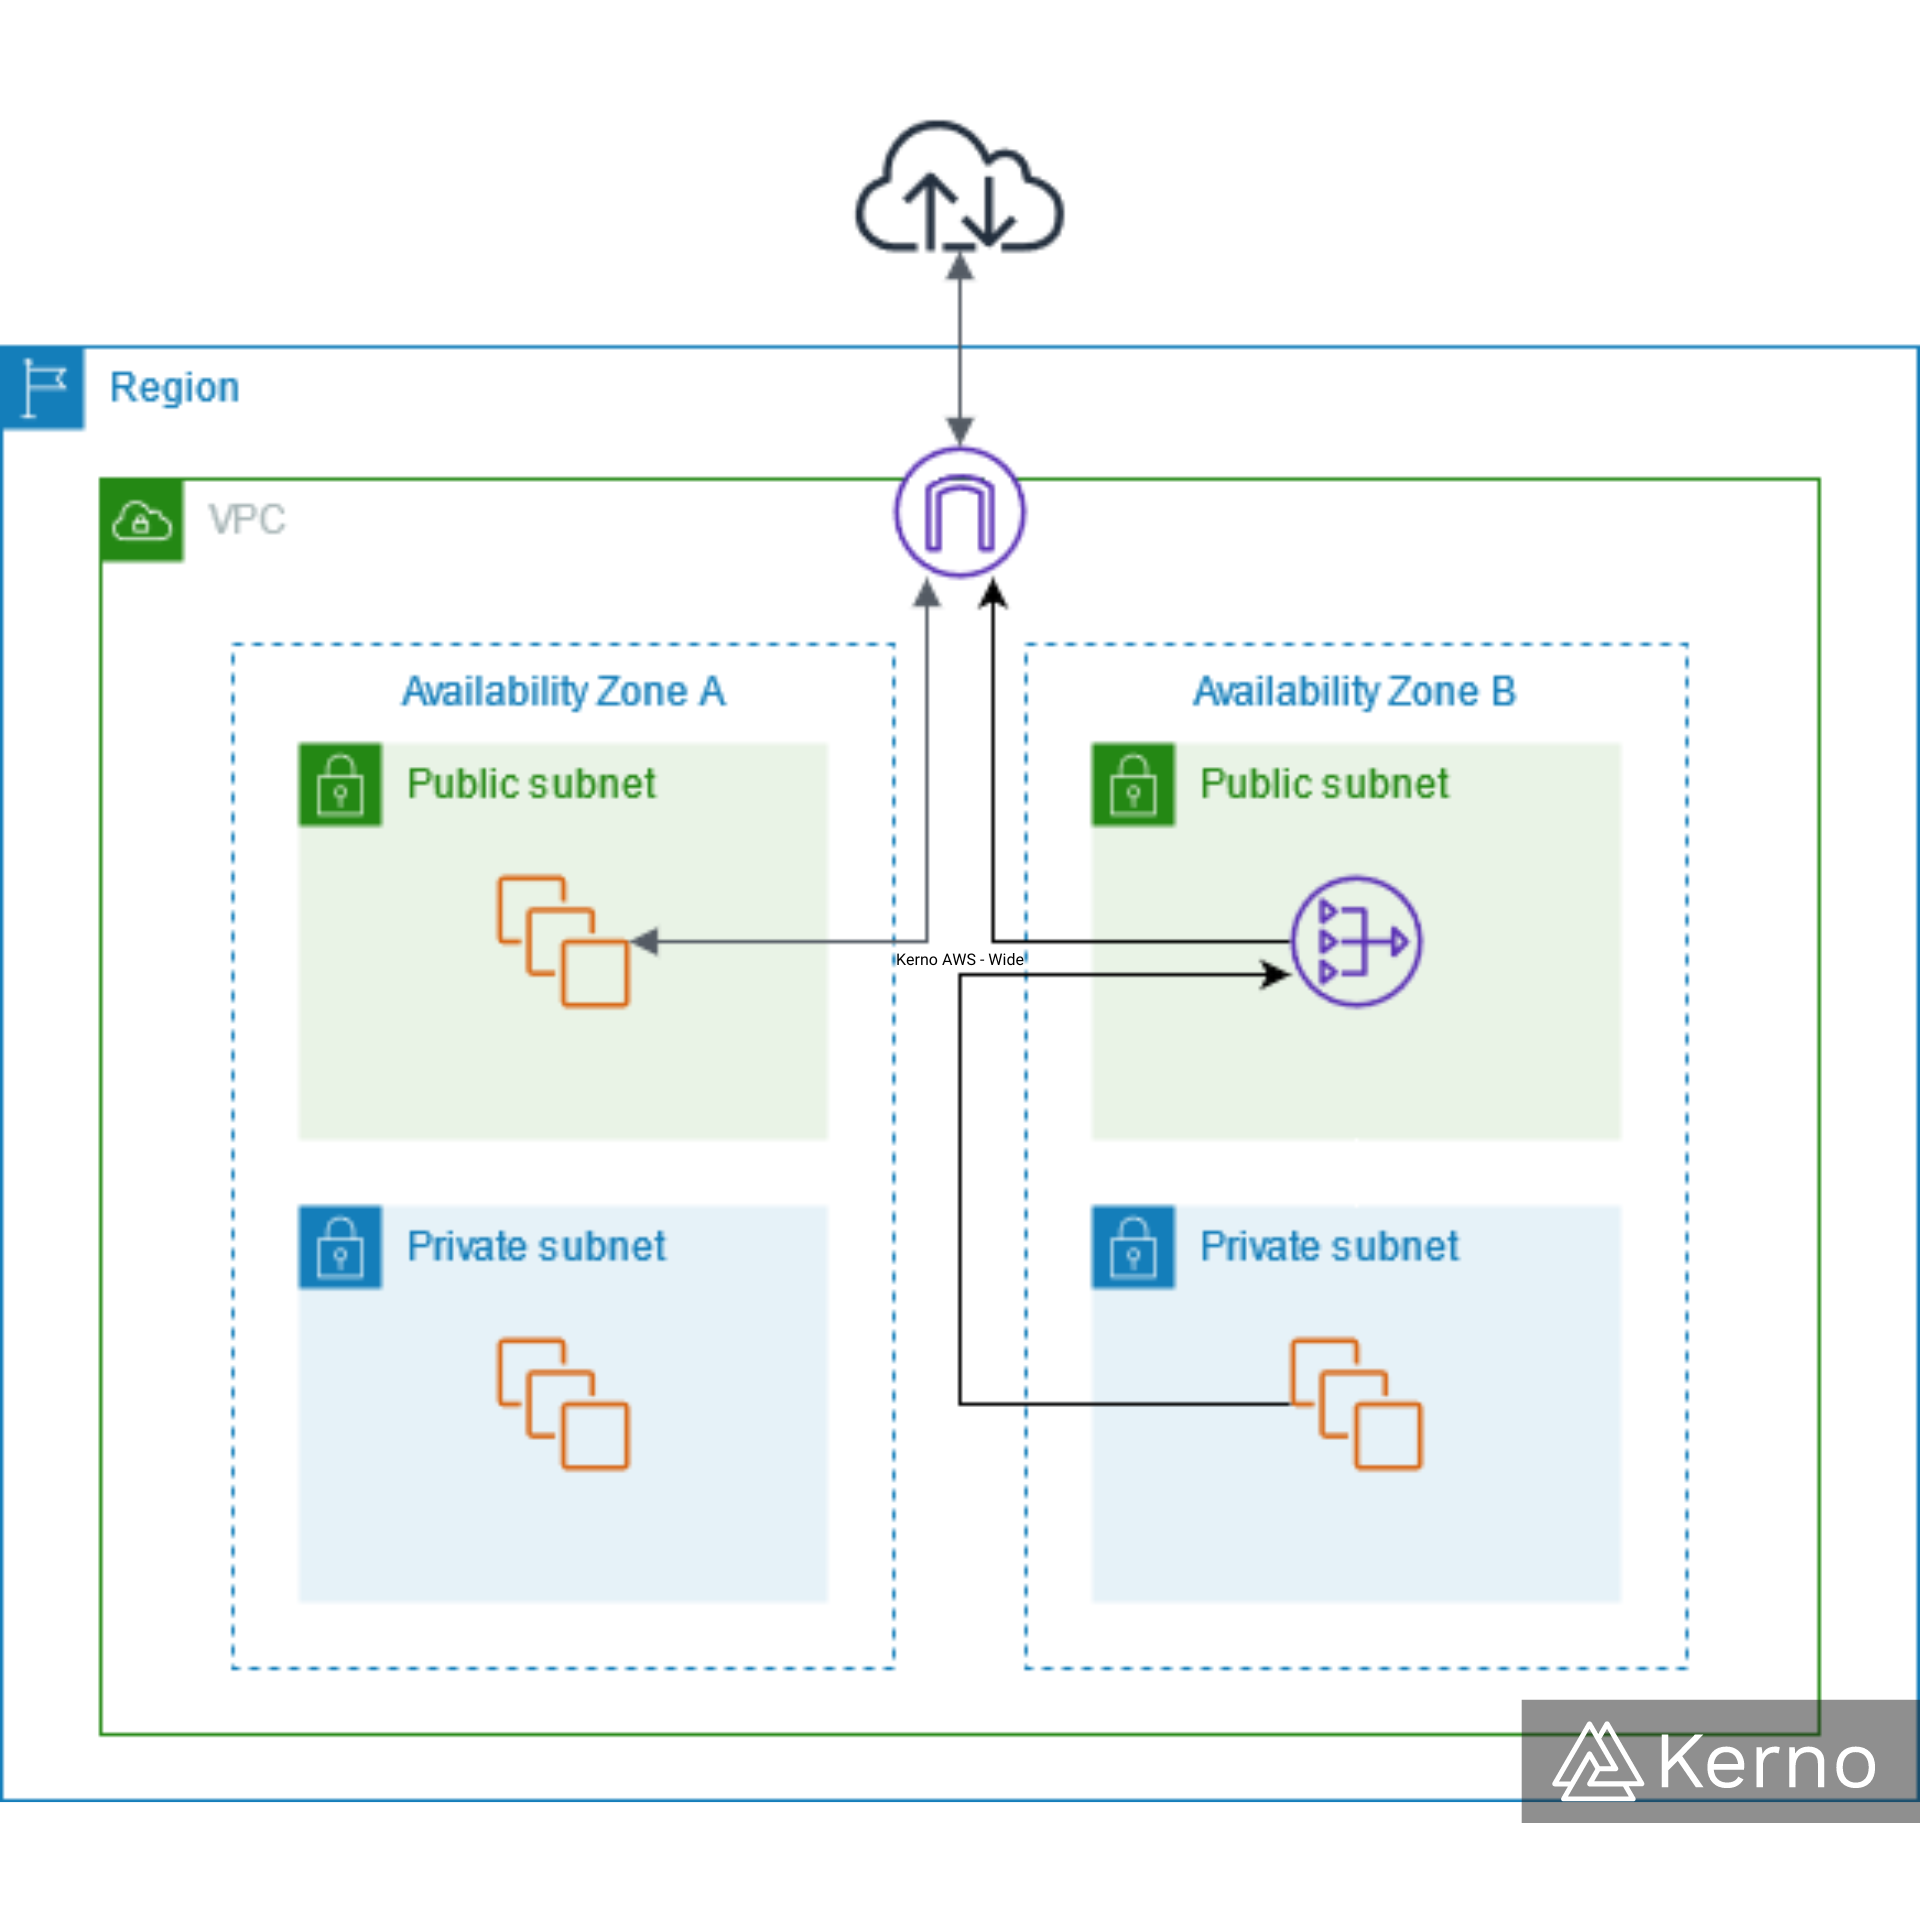
AWS Virtual Private Cloud, or VPC, can be thought of as a network-based segmentation for resources that run in AWS. Virtual network segmentation is used to address a few challenges in cloud infrastructure. The main goal is to separate public and private environments in order to control the flow of traffic and prevent cybersecurity risks to critical applications that don’t need to be exposed to the World Wide Web at all times.
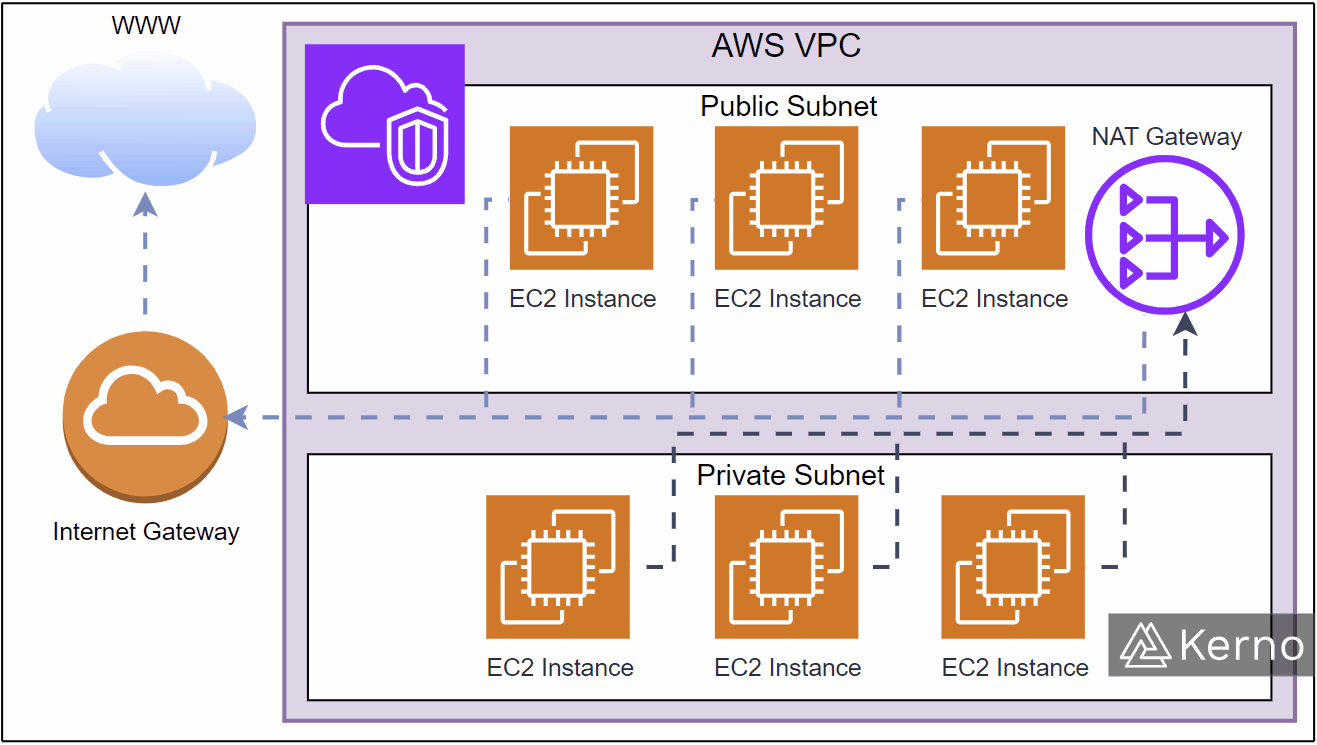
The image above is a basic illustration of how VPC segmentation works for a public and private subnet. The public subnet will contain a variety of services that need direct access to the web or will be accessed by users from the web. The private subnet may have requirements for accessing the web, but they need to be handled via a NAT Gateway. The gateway will thus dictate how, when, and how the instances that reside on the private subnet will access the web - Ex: for critical software updates during manual maintenance.
Network ACL and Security Groups
As mentioned above, it’s important to control the flow of traffic into and out of the VPC. One of the ways to specify the IP addresses that can access the VPC are Network Access Control Lists, or NACLs). An ACL is a networking tool that acts as a firewall and can be used to specify rules that allow and/or deny certain traffic based on IP addresses or the 3rd layer of the OSI model. In AWS, NACLs are specified at the Subnet level; it’s thus possible to have different rules and traffic access to various services/applications inside the same VPC.
We’ve covered Security Groups extensively in our tutorial on EC2. In AWS, Security Groups are tied to a single or multiple EC2 instances and can be used to block or allow traffic into the specified group. The major difference between ACLs and Security Groups is that SGs only contain ALLOW rules while ACLs can contain both ALLOW and DENY. Furthermore, and ACL is a general networking component that can be used across a variety of other services (Ex: Load Balancers) while the SGs are only applicable to ENIs and EC2s.
Creating a VPC in AWS
Out of the box, every AWS user will have access to the default VPC. We don’t recommend using it as it is initially deployed - it’s not secure with multiple IP addresses open to the public. In this section, we’ll create a new VPC that you can use for your services, applications, etc.
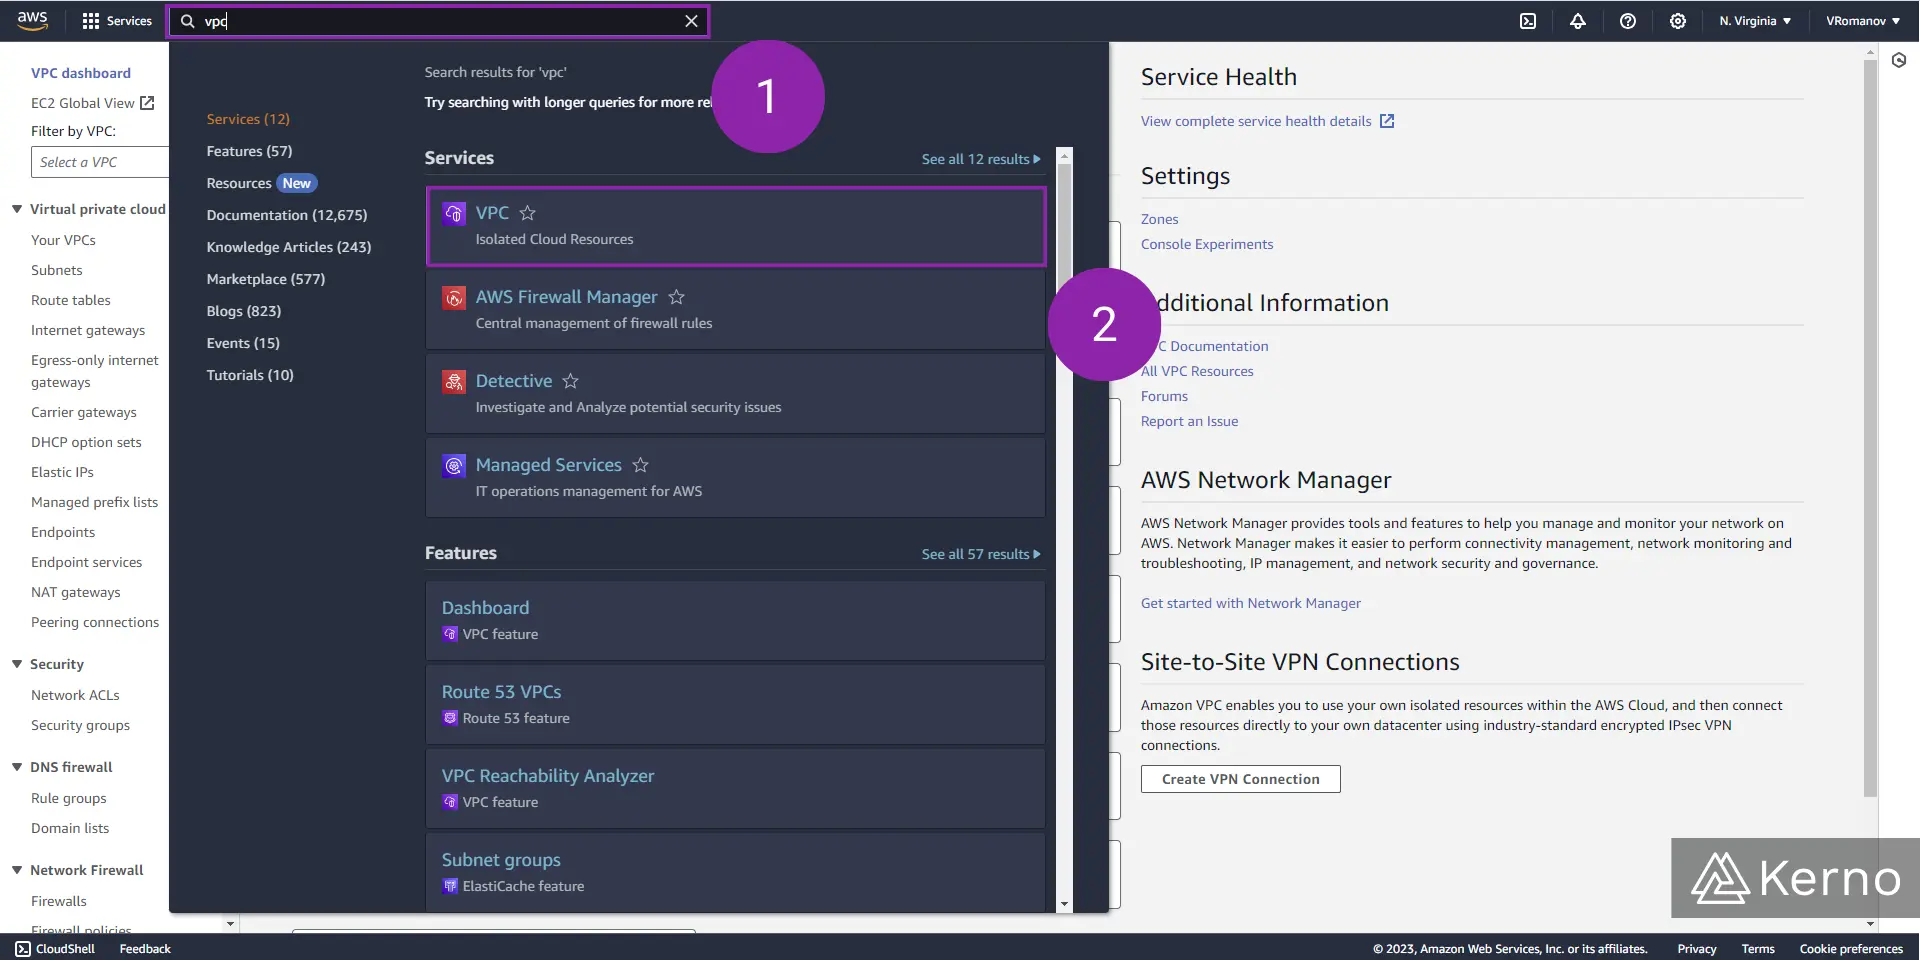
Step 1 - Navigate to the VPC Console
1.1 - From the AWS Console, search for “vpc.”
1.2 - From the drop-down menu, click on “VPC.”
You should now be on the VPC Console.
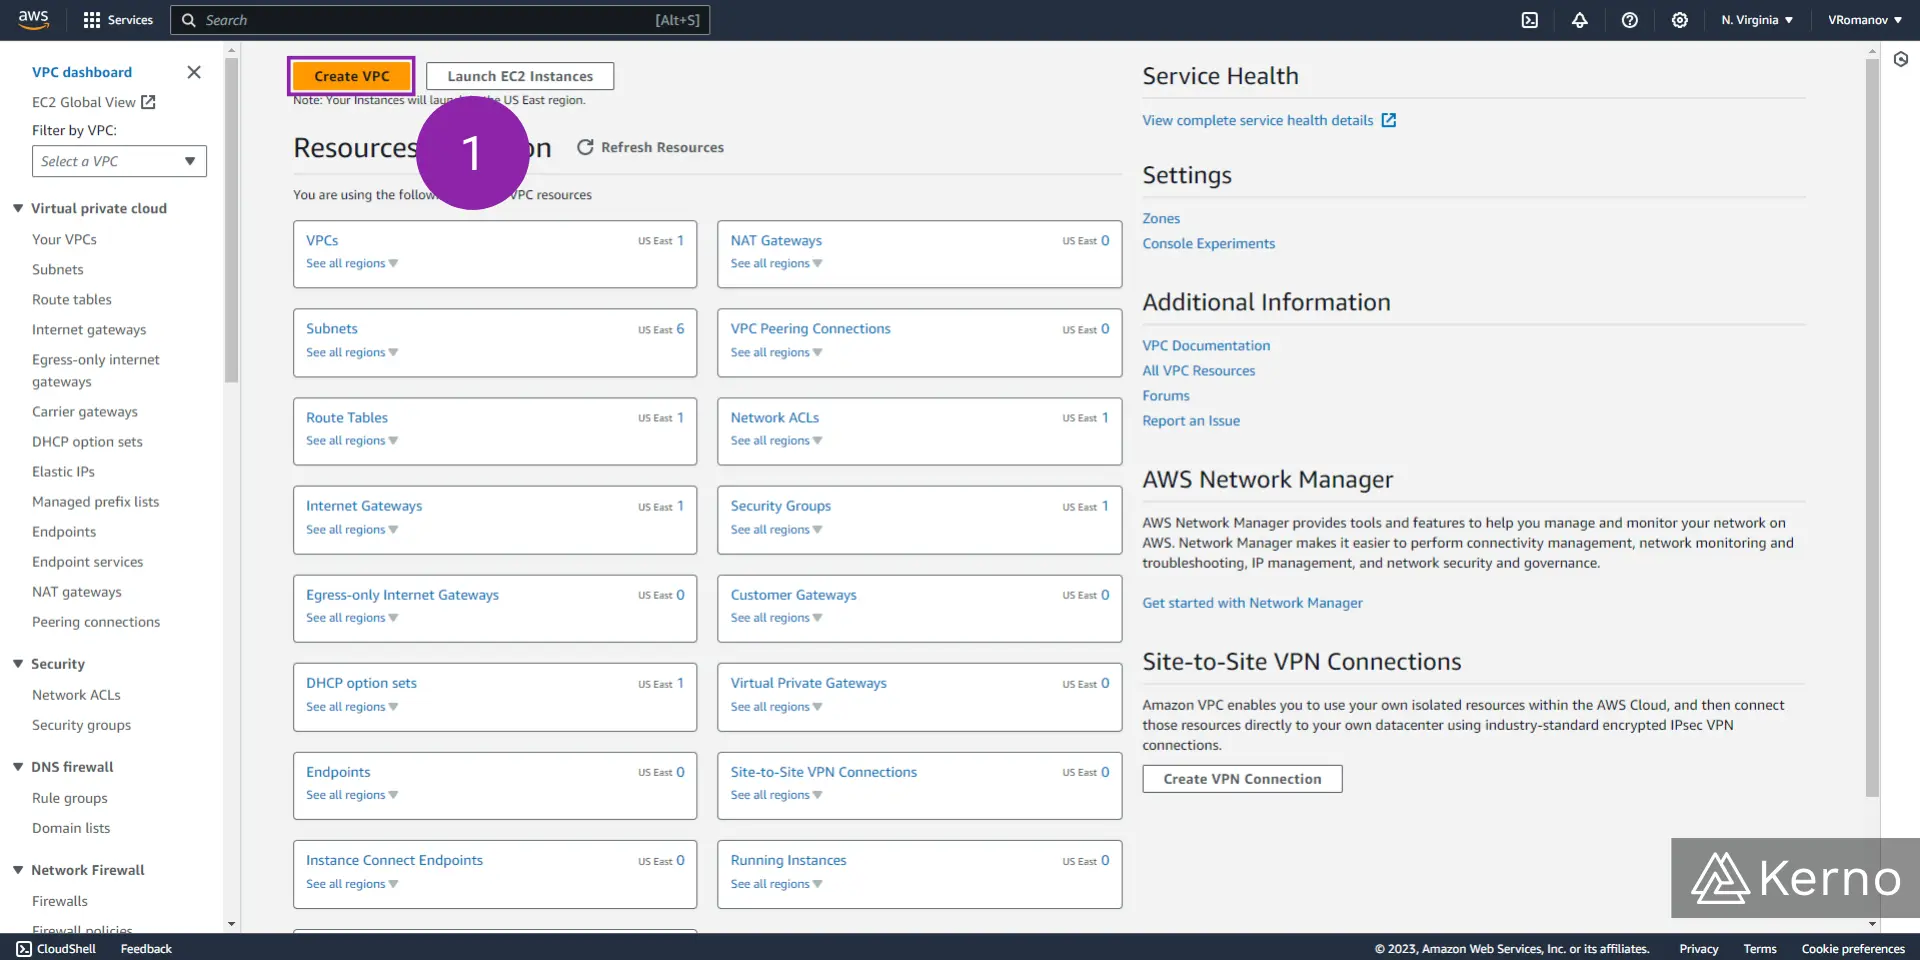
Step 2 - Create a New VPC
2.1 - From the VPC Console, click on “Create VPC.”
You should be brought to a series of options to create a new VPC.
Step 3 - Specify VPC Parameters
3.1 - From the “Resources to create” option, select “VPC only.”
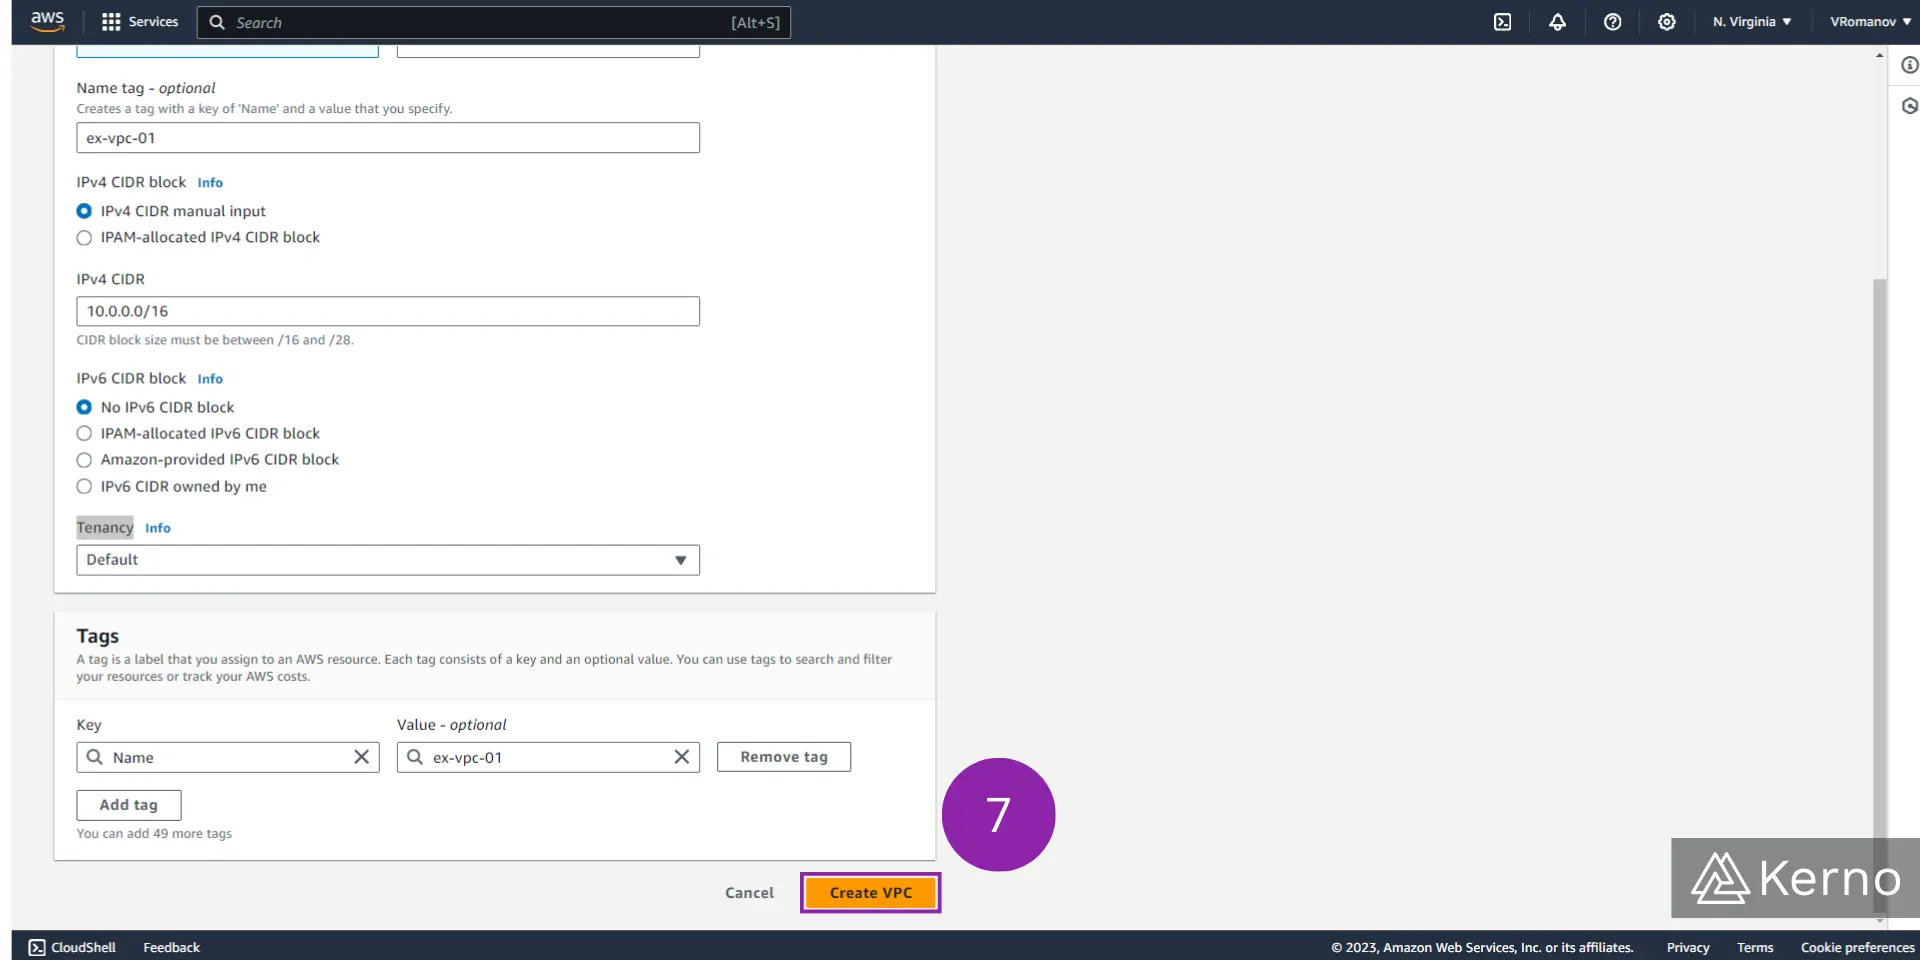
3.2 - In the optional “Name tag” field, enter the desired name for the VPC you’ll be creating.
3.3 - From the “IPv4 CIDR block” option, select “IPv4 CIDR manual input.”
3.4 - In the “IPv4 CIDR” field, specify the IP address and subnet mask to be used for the resources within the VPC.
It’s important to note that you can specify IP addresses outside of what we’ve done. However, we recommend that you pick one of the private IP address ranges below; they’re commonly used in the industry and will be recognizable by those that work on the system.
- Class A: 10.0. 0.0 to 10.255. 255.255.
- Class B: 172.16. 0.0 to 172.31. 255.255.
- Class C: 192.168. 0.0 to 192.168. 255.255.
3.5 - From the “IPv6 CIDR block” option, select “No IPv6 CIDR block.”
3.6 - From the “Tenancy” dropdown, select “Default.”
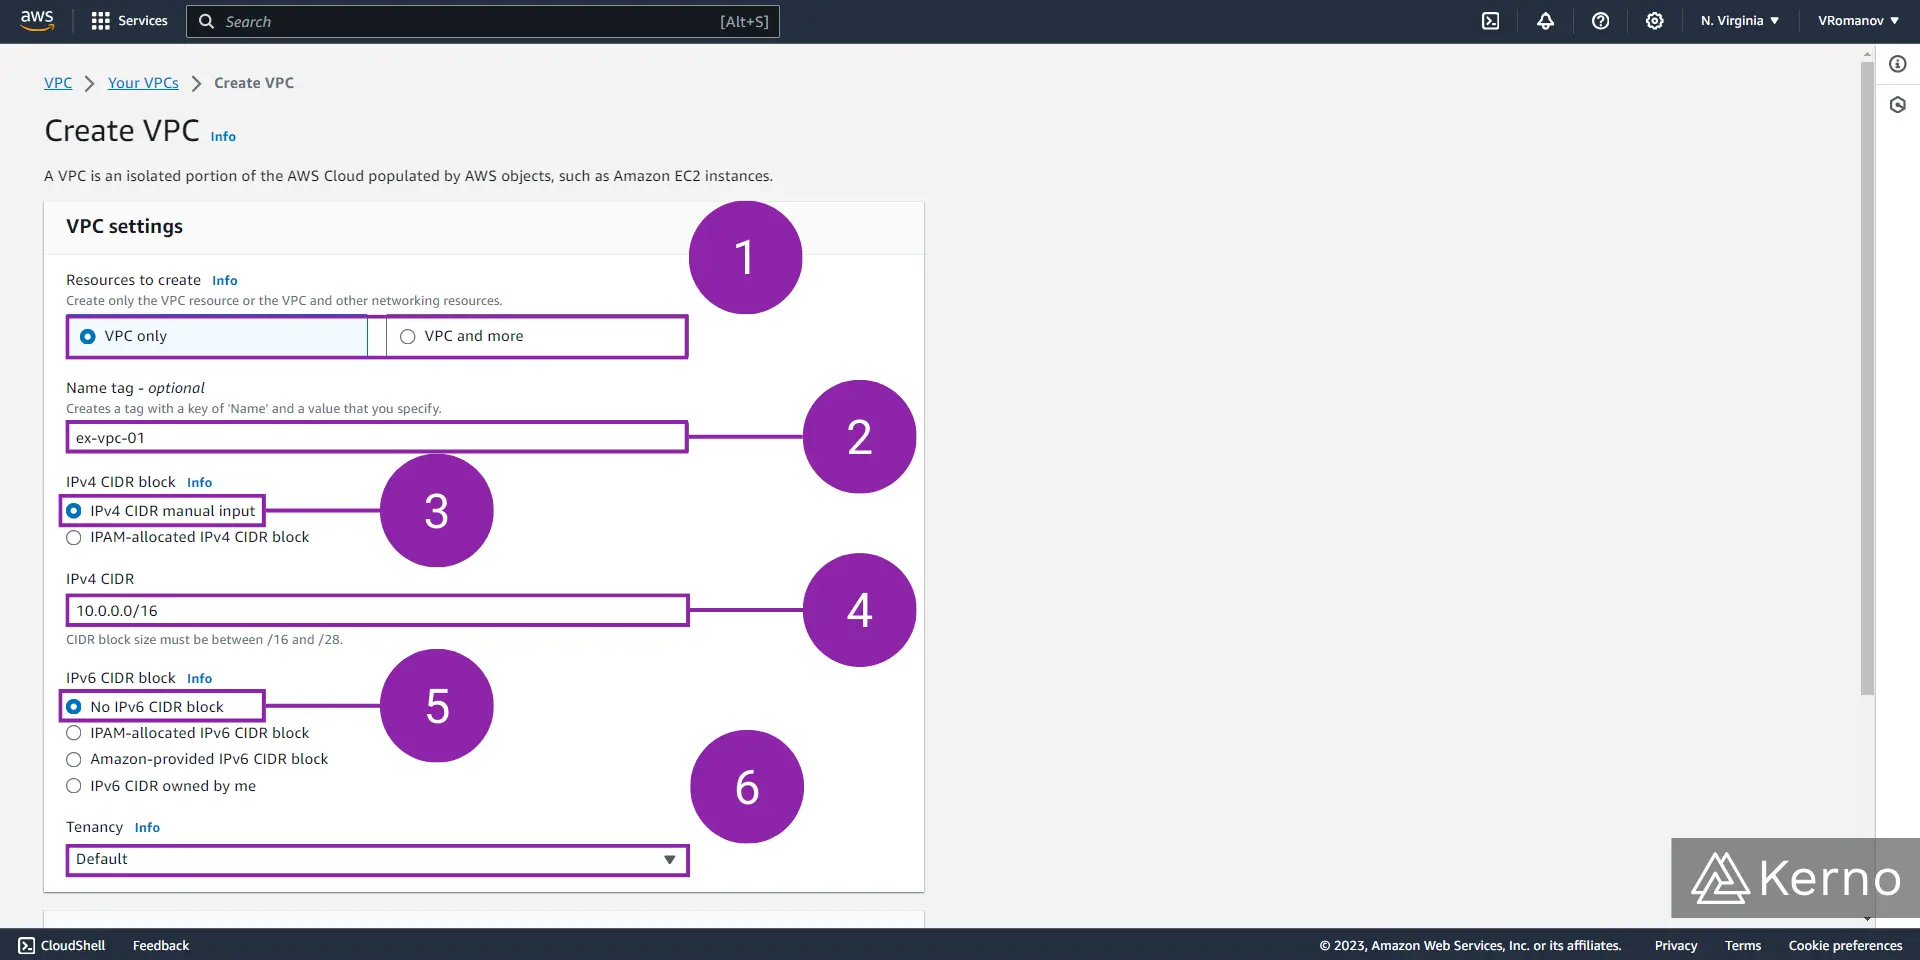
3.7 - At the bottom of the page, click on “Create VPC.”
Running VPC
At this point, you should have a VPC running in your AWS environment. Here’s a screenshot of the status of the VPC we’ve created in the steps above.

Creating a Subnet for the VPC in AWS
Now that we have an established VPC, we must populate it with a few Subnets. As discussed earlier in this tutorial, a Subnet will contain EC2 instances and other AWS services; it’s thus “impractical” to have a VPC without any Subnets!
Step 1 - Navigate to the Subnet Console
1.1 - From the VPC Console, click on “Subnets.”
You should now be on the Subnets Console. Notice that on this page you’ll find a list of all subnets that have been instantiated on the account. Note that we have a list of 6 subnets tied to the default VPC in this case. The VPC we created in the previous section does not have any subnets attached.
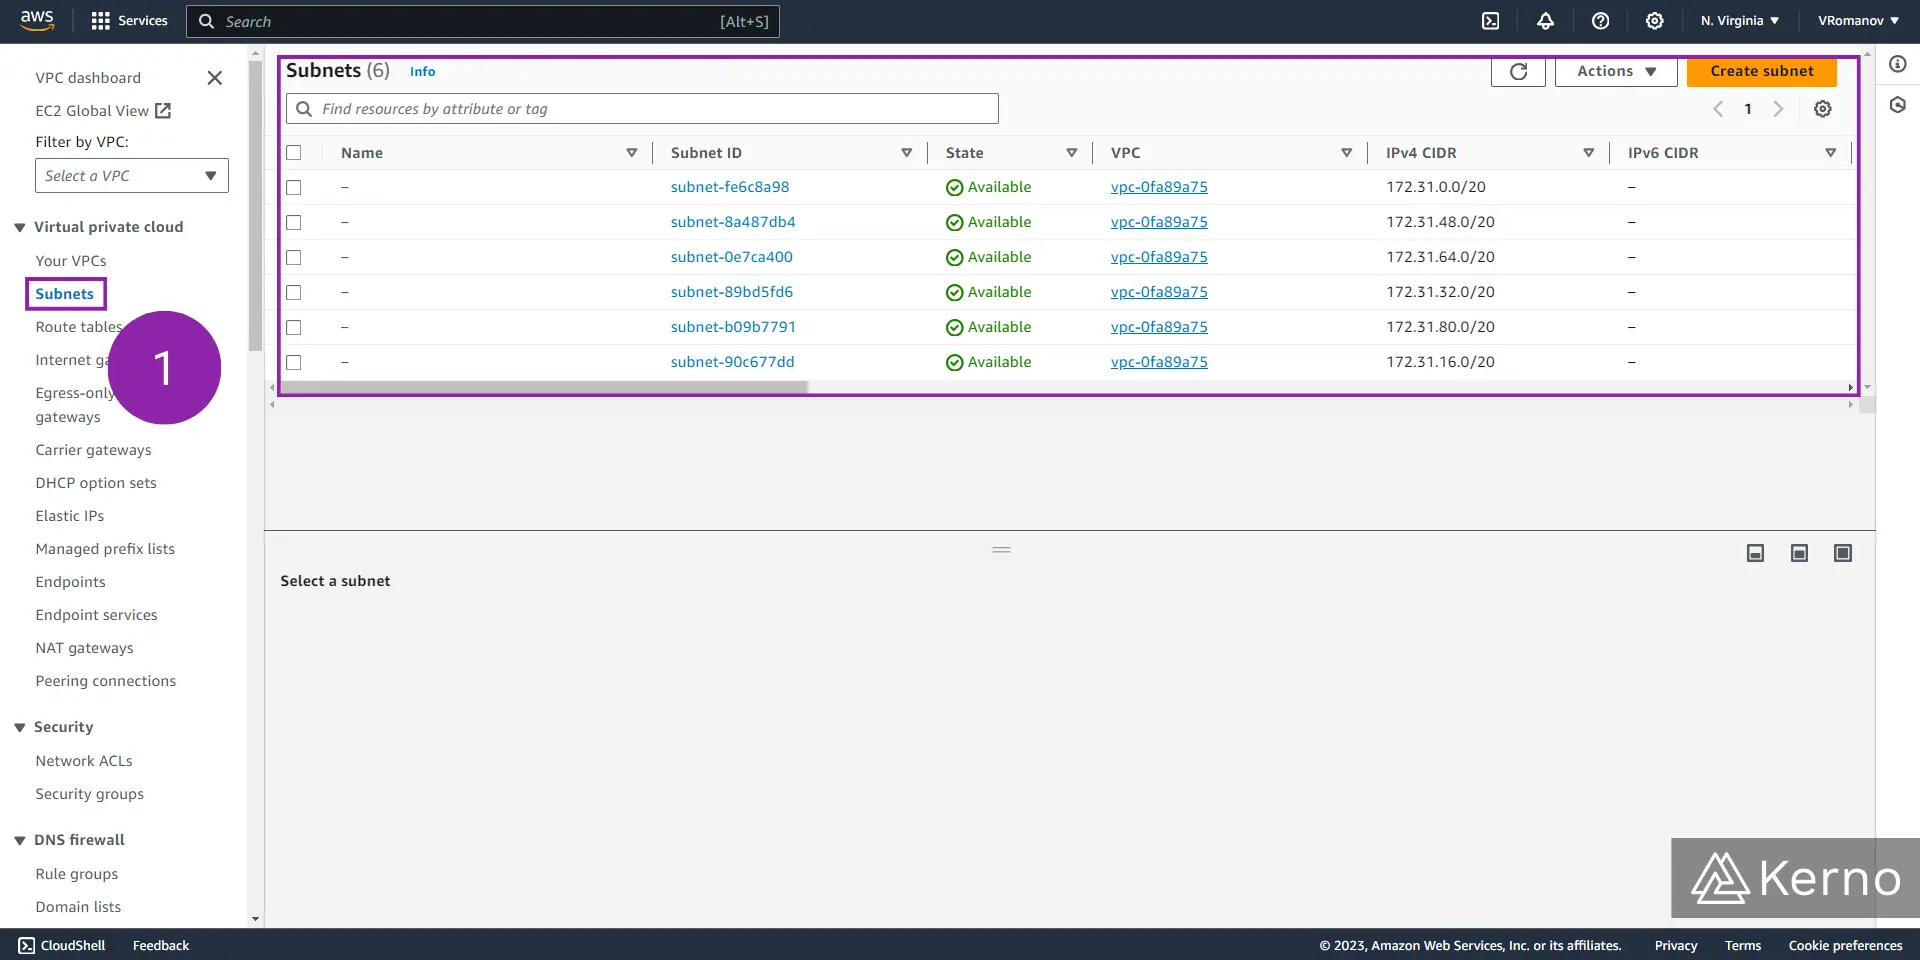
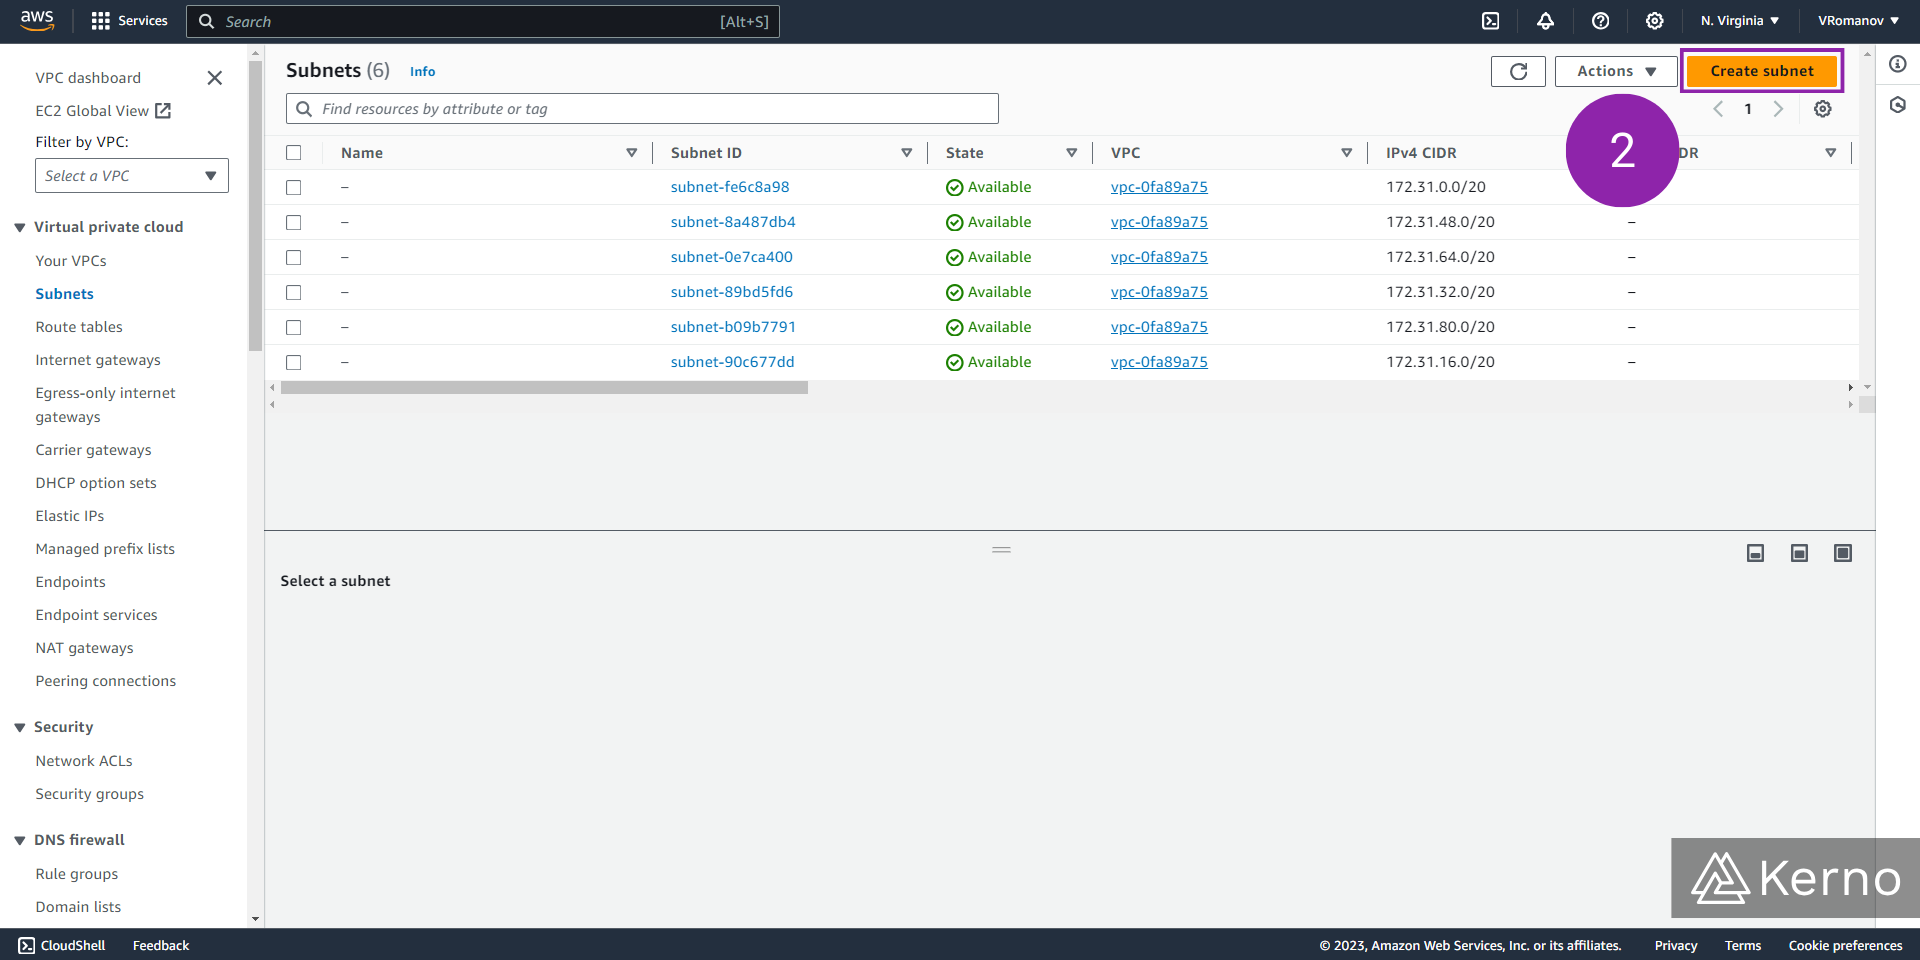
1.2 - Click on “Create subnet.”
Step 2 - Select the VPC for Which to Create a Subnet
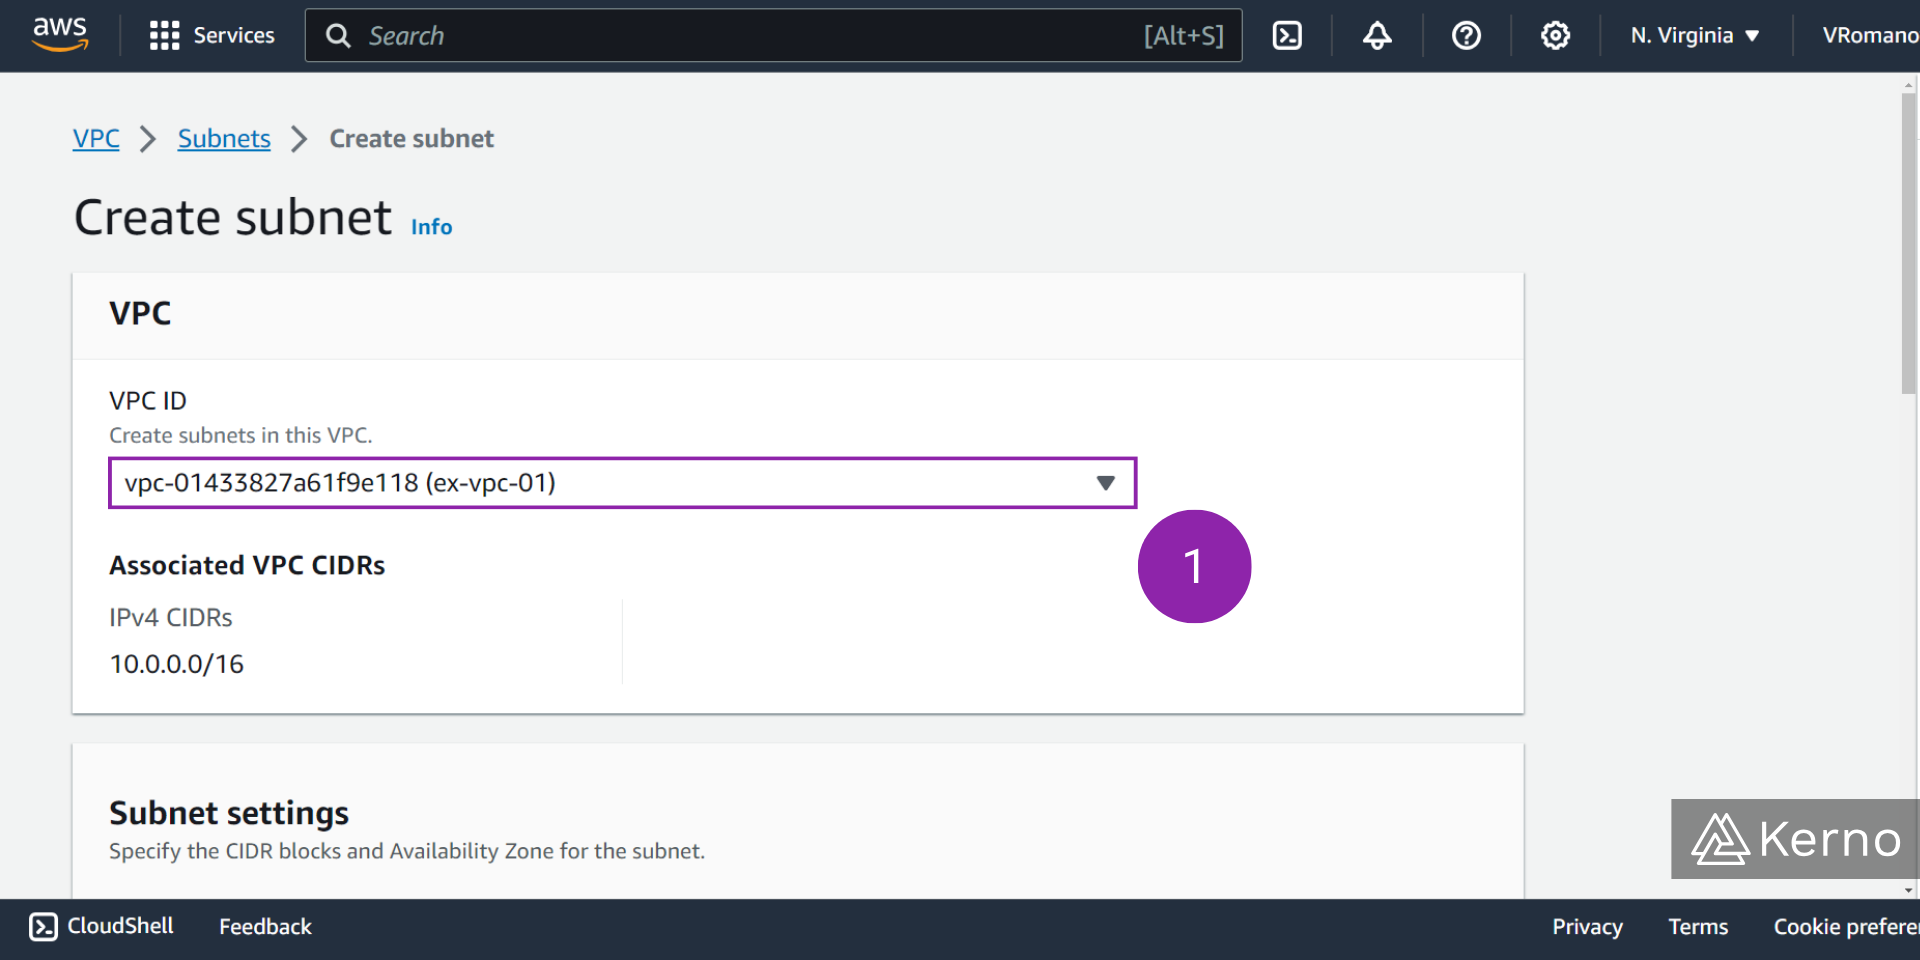
2.1 - From the “Create subnets in this VPC” dropdown, select the VPC you’d like to create a subnet for.
Notice that you’ll only see the settings below once you’ve selected a VPC.
Step 3 - Specify the Parameters for the Subnet
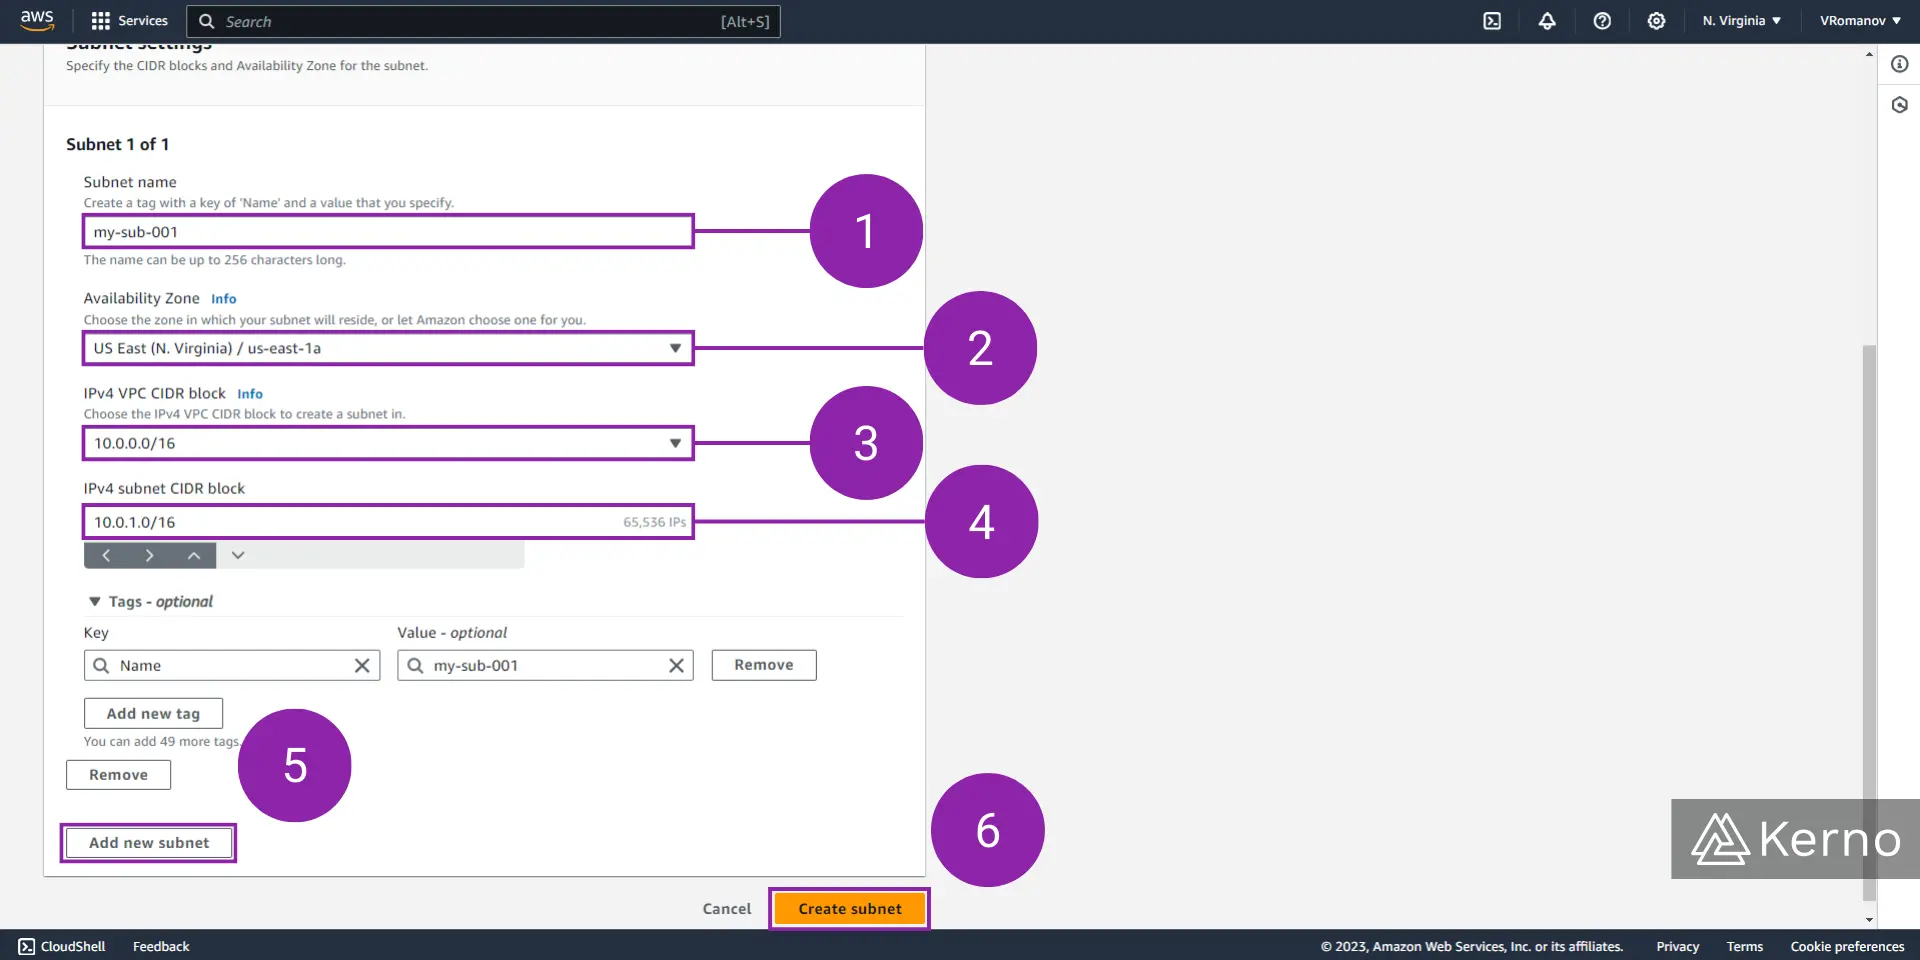
3.1 - In the “Subnet name” field, enter the desired name for the Subnet you’ll be creating.
3.2 - From the “Availability Zone” dropdown, select the zone in which your subnet will reside. In this example, we’re deploying the subnet in the US East us-east-1a region.
3.3 - From the “IPv4 VPC CIDR block” dropdown, select the block you’ve defined for your VPC. In this example, we’re choosing “10.0.0.0/16” that was defined during the VPC creation process.
3.4 - In the “IPv4 subnet CIDR block” field, enter the IP address and subnet mask that will be used for this subnet. Note that there’s a hint of how many IP address will be available once the subnet is deployed with those settings.
3.5 - [OPTIONAL] You can create multiple subnets by clicking on the “Add new subnet” button and specifying the settings as outlined above.
3.6 - At the bottom of the page, click on “Create subnet.”
At this point, you’ll be brought back to the Subnet screen, where you’ll find the subnet you’ve just created.

Creating an Internet Gateway for the VPC in AWS
Now that we have a VPC and a Subnet, we need to create an Internet Gateway that will route the traffic to the Subnet. As discussed in the introduction, without an Internet Gateway, no traffic will flow to an EC2 Instance that would be running on the subnet we’ve just created. Note that you won’t be able to access the EC2 instance either; until we create the Internet Gateway, attach it to the VPC, and specify the correct routing parameters.
Step 1 - Navigate to the Internet Gateways Console
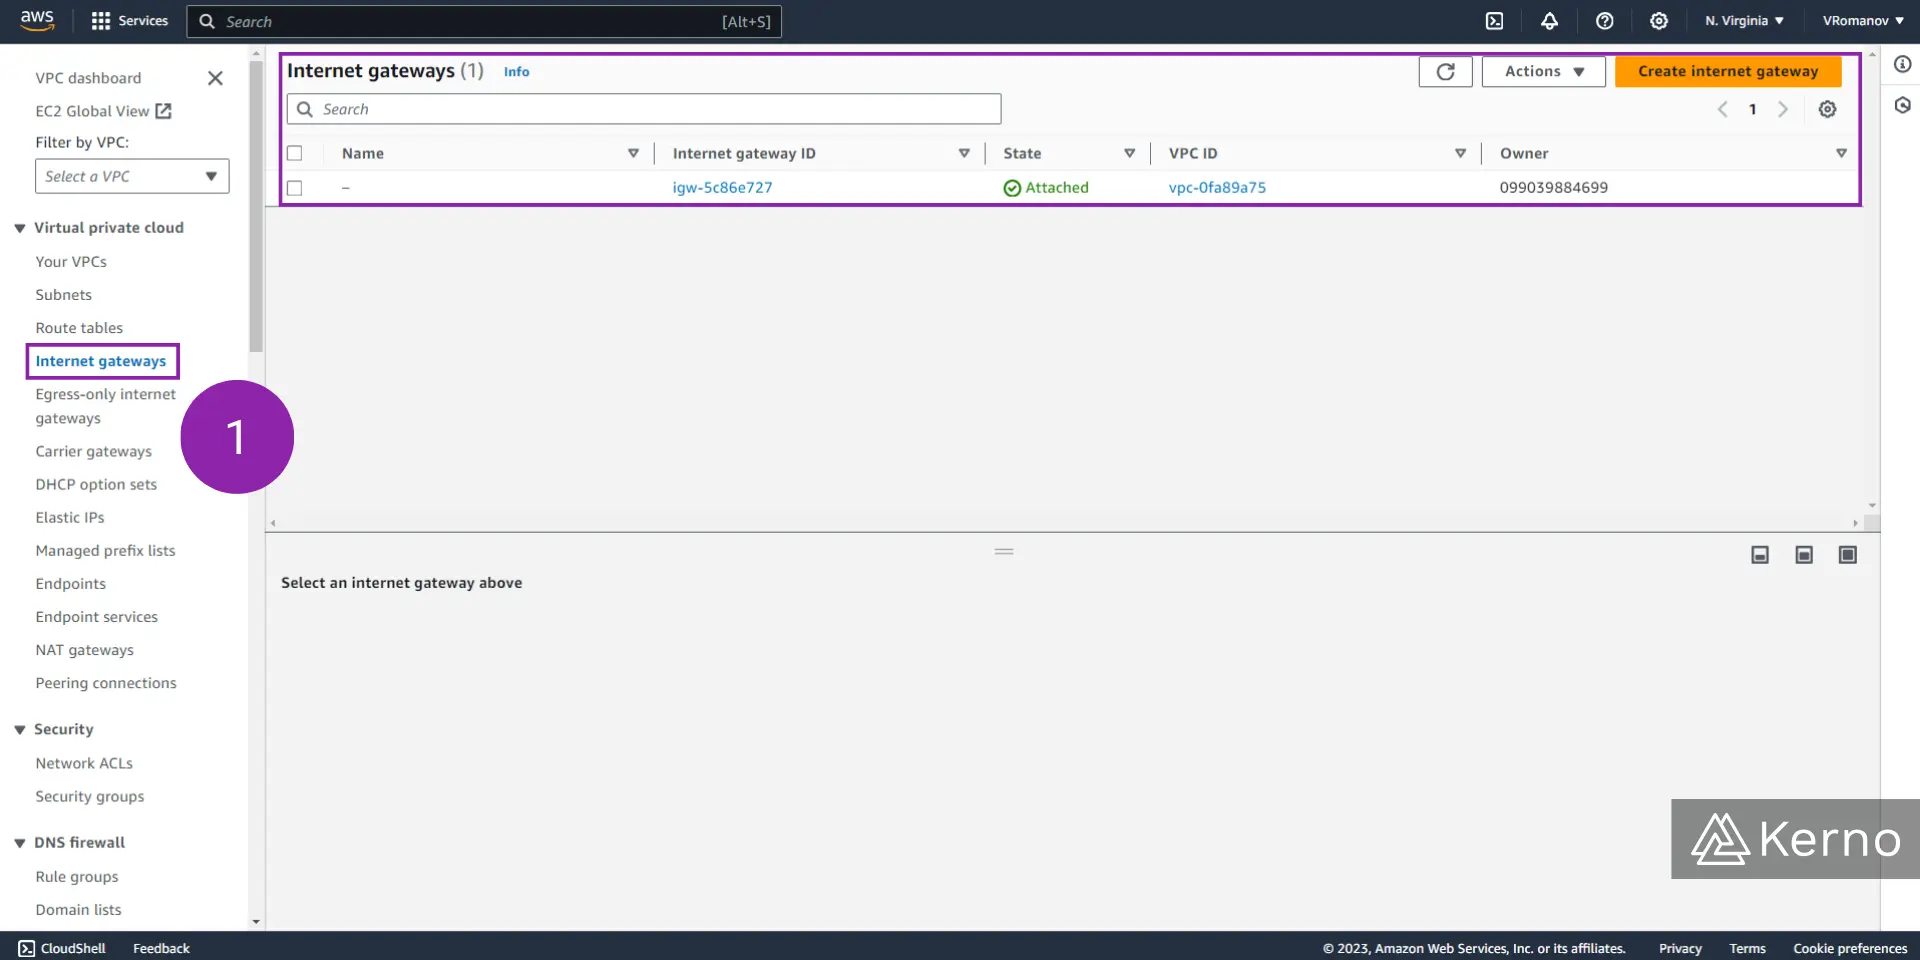
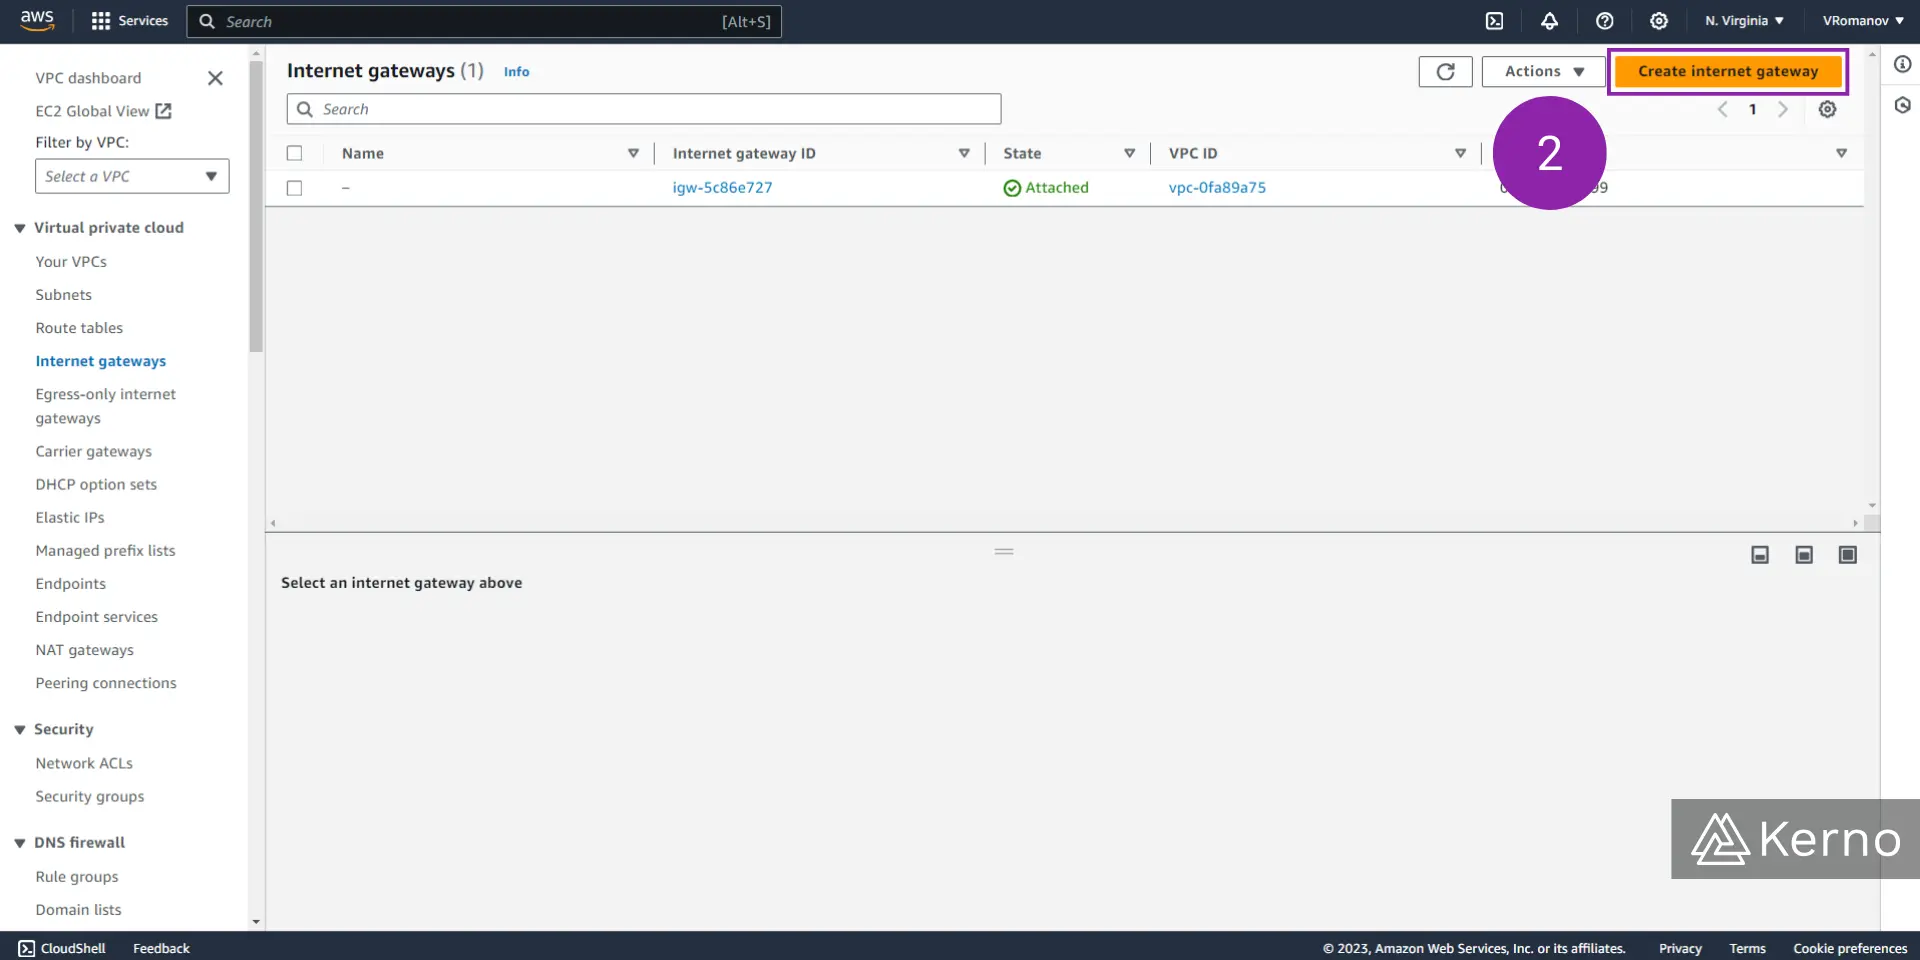
1.1 - From the VPC Console, click on “Internet gateways.”
Note that as we saw in the Subnet section, the Internet Gateways console will contain the “default” gateway that was specified as we created our account.
1.2 - Click on “Create internet gateway.”
Step 2 - Create the Internet Gateway
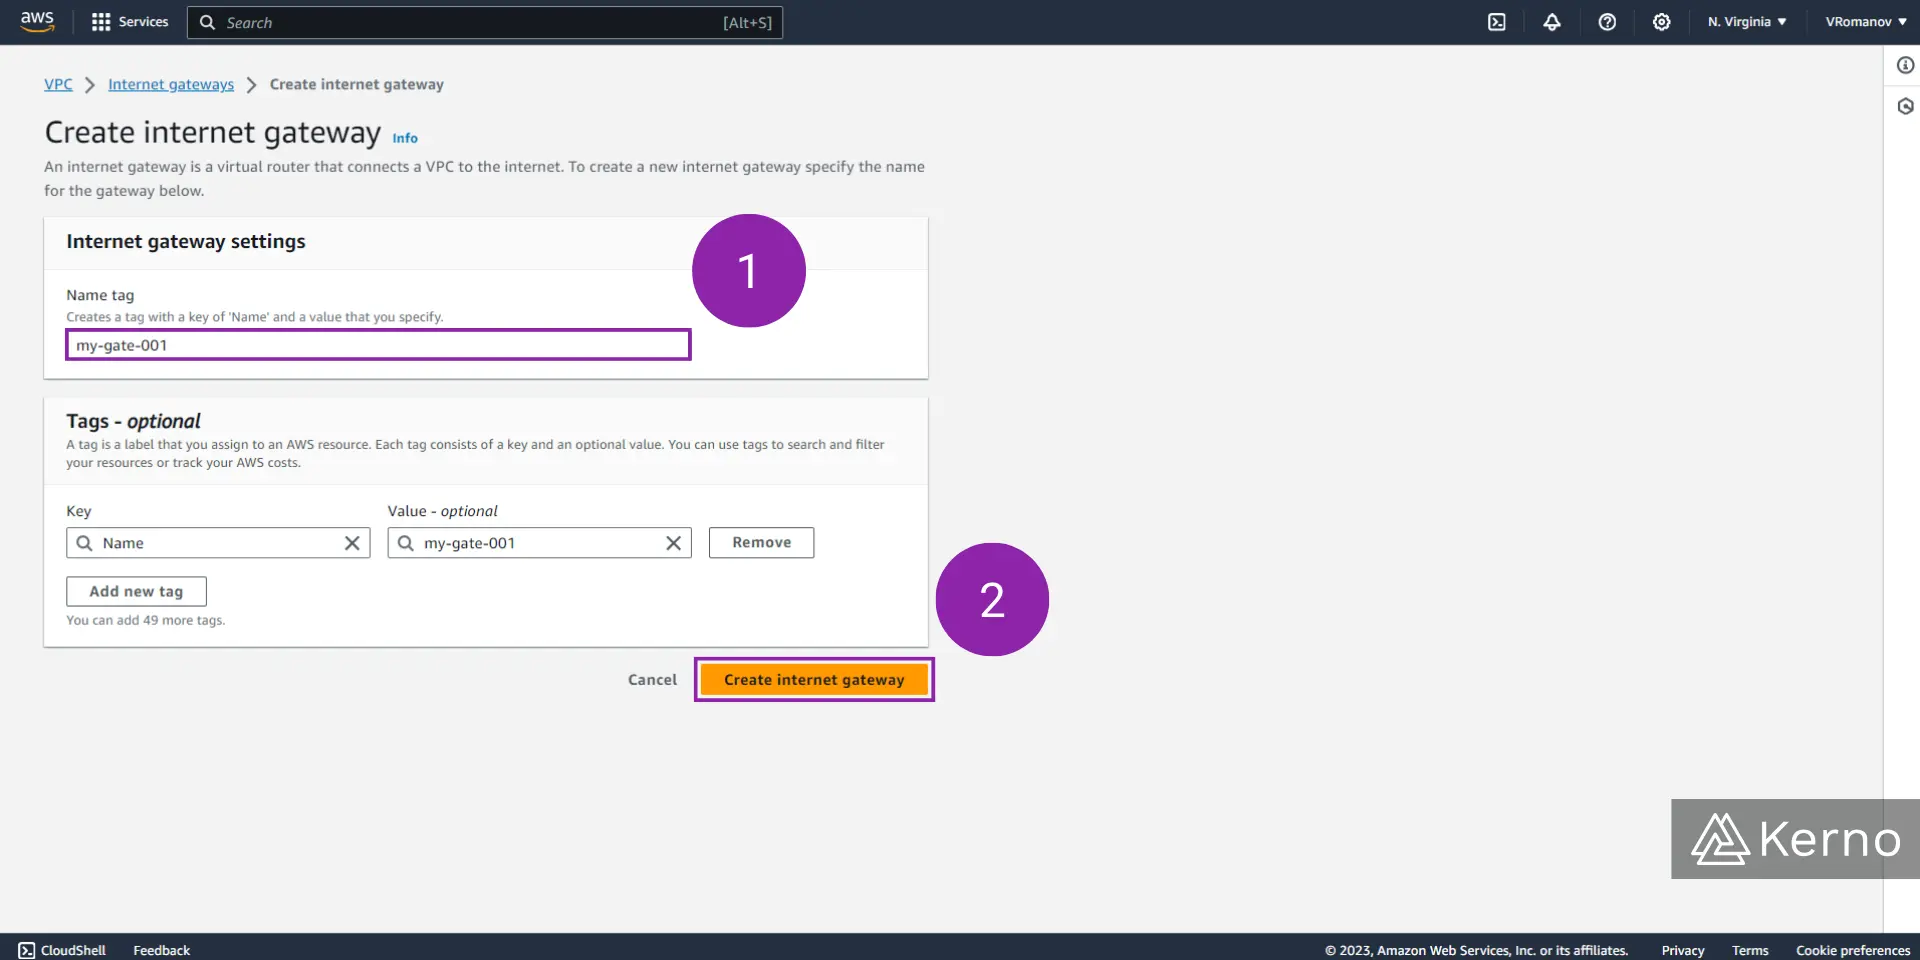
2.1 - In the “Name tag” field, enter the desired name for the Internet Gateway you’ll be creating.
2.2 - At the bottom of the page, click on “Create internet gateway.”
At this point, you’ll be brought back to the internet gateway screen, where you’ll find the internet gateway you’ve just created.

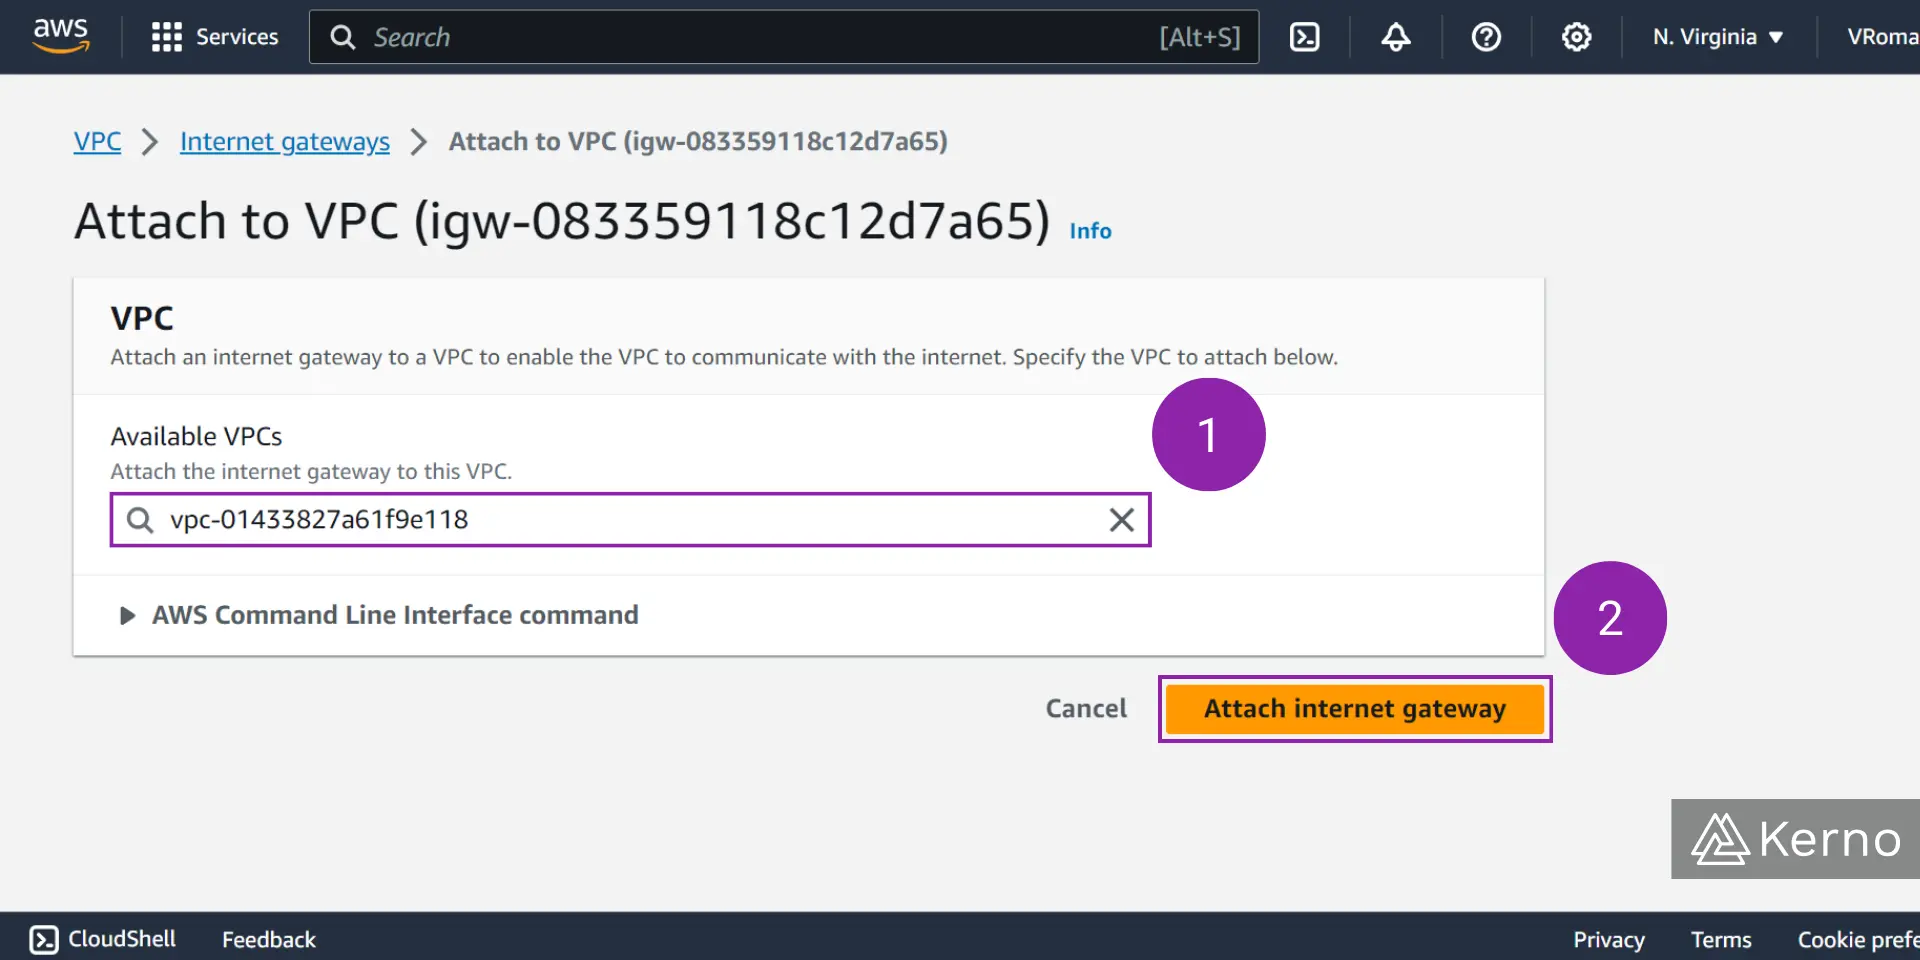
Attaching an Internet Gateway to a VPC
It’s important to note that although we’ve created an internet gateway, it’s not tied in any way to the VPC we’ve created in the previous step. In the image above, you can see a green bar that lets the user know that the next natural step in the process is to attach the internet gateway that has just been created to a VPC.
Step 1 - Attach Internet Gateway to a VPC
1.1 - In the “Available VPCs” field, search for the VPC to which you’d like to attach the internet gateway.
1.2 - At the bottom of the page, click on “Attach internet gateway.”
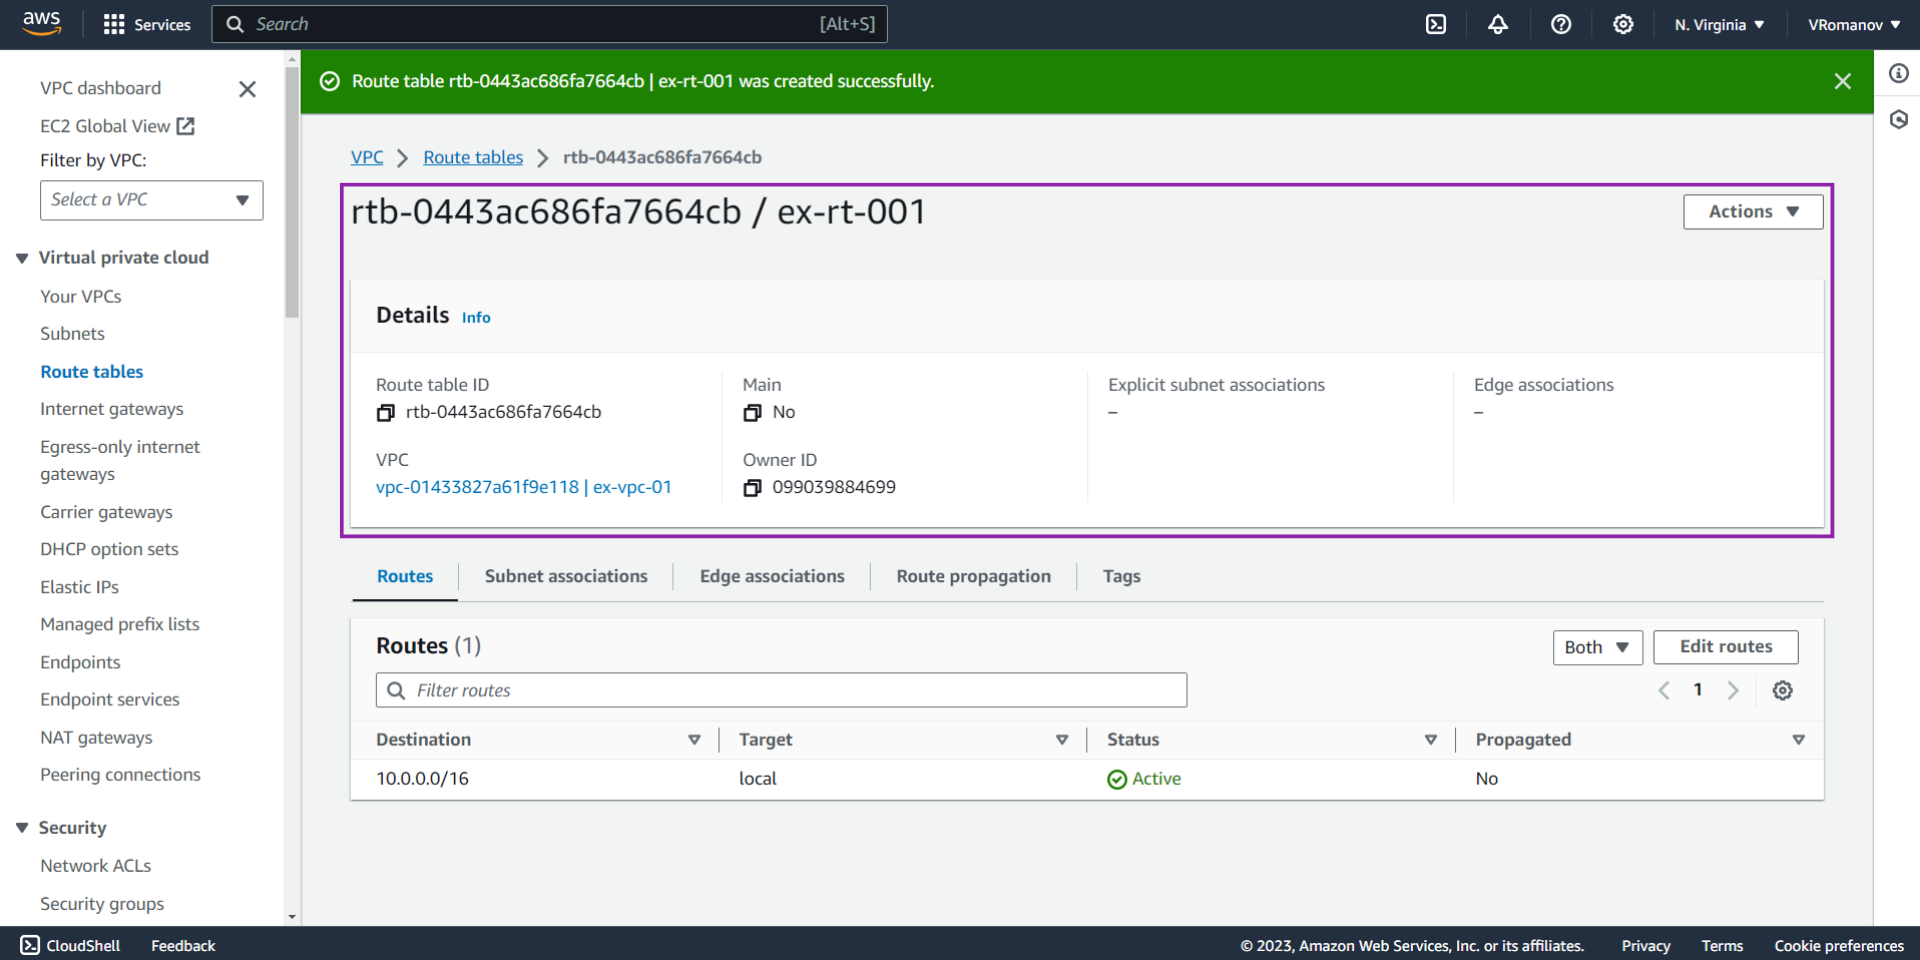
Creating a VPC Route Table
Route Tables are an AWS specification sheets for traffic allowed in / out of various services. By default, as mentioned above, a VPC will not allow any external traffic into it. However, a route table that allows for internal traffic to be routed will be created. In this section, we’ll create a second route table for our VPC that will open up external connections to the VPC.
Step 1 - Navigate to the Route Tables Console
1.1 - From the VPC Console, click on “Route tables.”
Note that in this table we’ll find two route tables, one for each VPC (the default one, and the one we’ve just created).
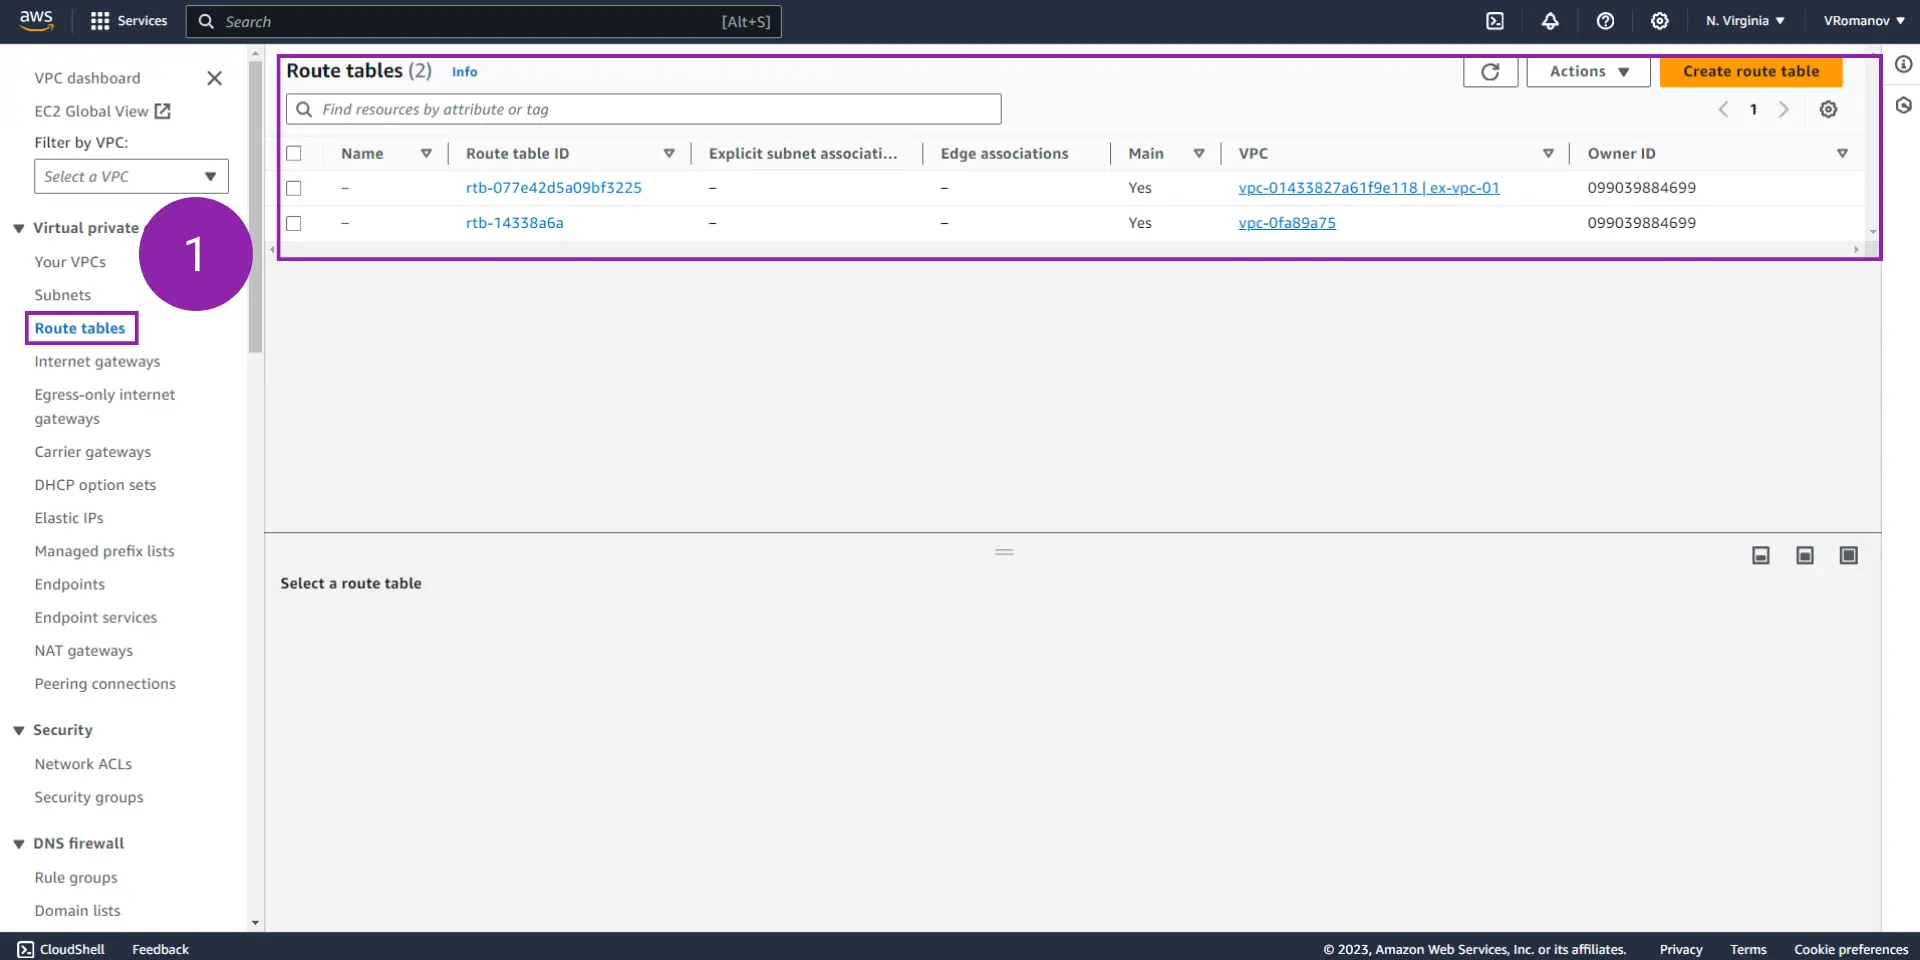
1.2 - Click on “Create route table.”
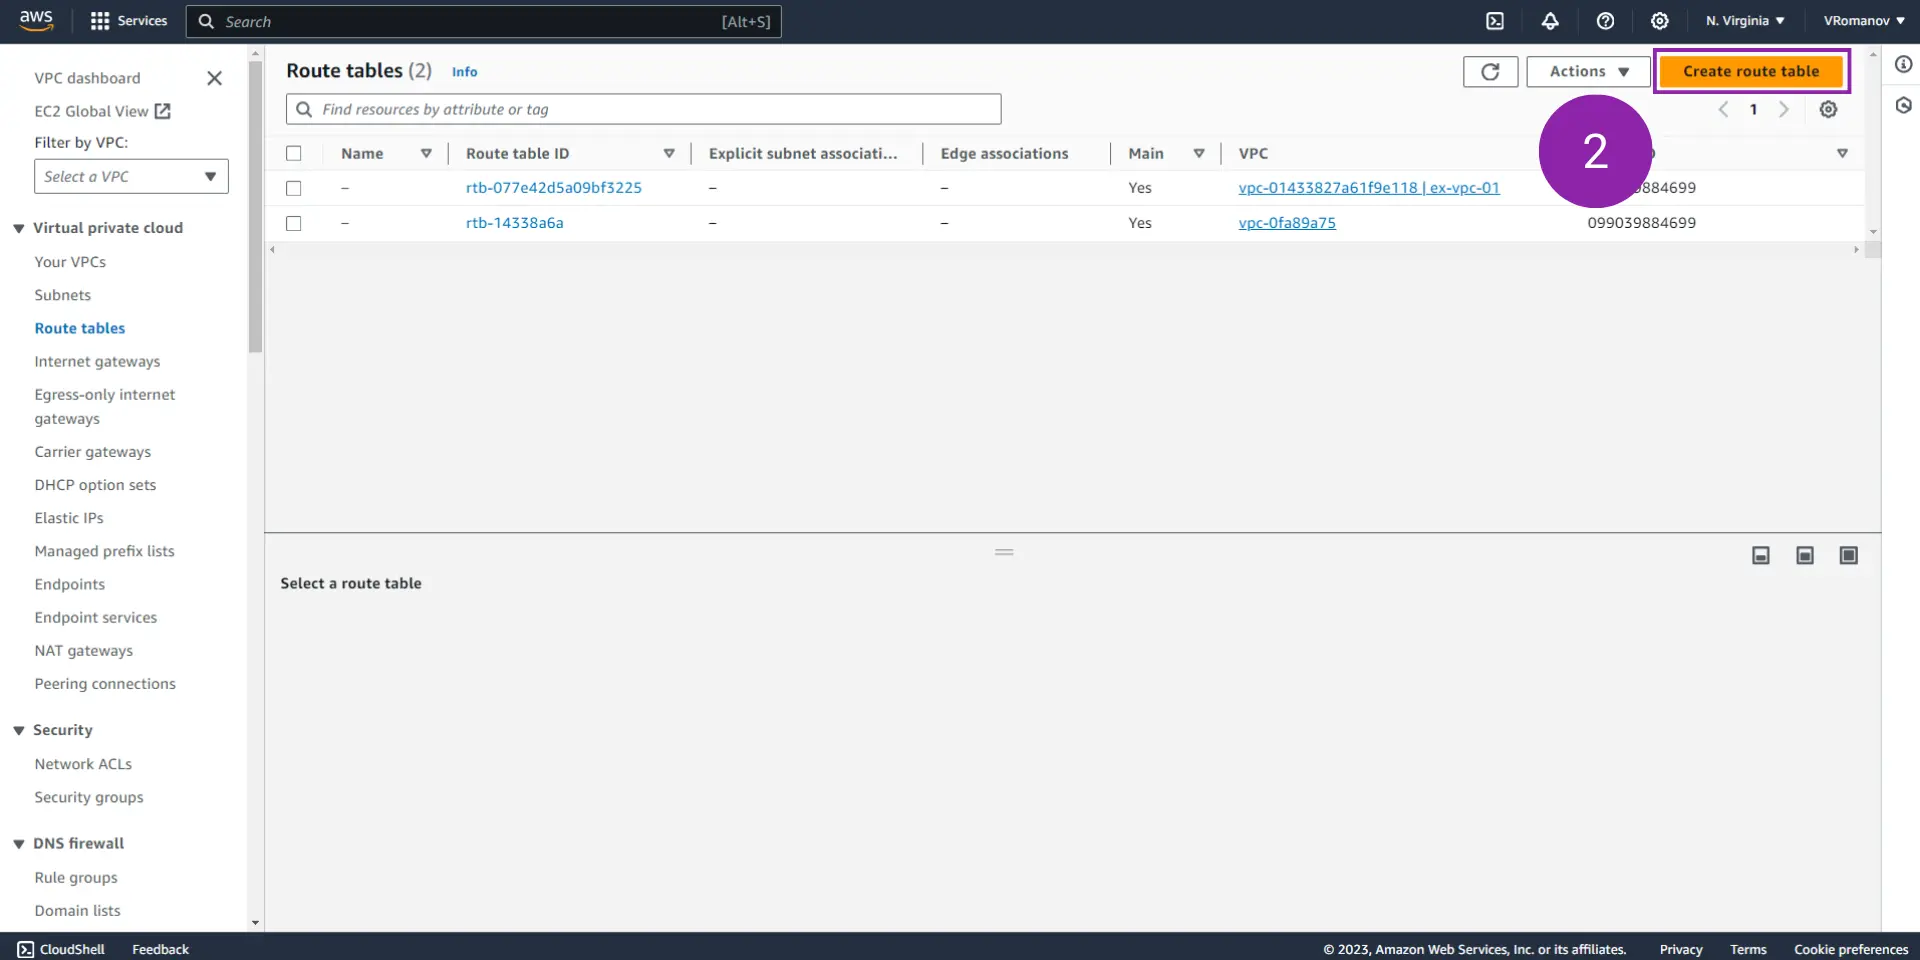
Step 2 - Specify the Parameters of the Route Table
3.1 - [OPTIONAL] In the optional “Name” field, enter the desired name for the route table you’ll be creating.
3.2 - From the “VPC” dropdown, select the VPC we created in one of the sections above.
3.3 - At the bottom of the page, click on “Create route table.”
At this point, you should have a route table that can be used to direct external traffic into the VPC we’ve created.
VPC / Networking Concepts - Private, Public, and Elastic IP Addresses
As you deploy VPC onto the cloud, it’s important to understand the location and reach of various services within the VPC and externally. A subnet within a VPC can be specified as private, public, or a mix of the two - elastic. These delineations are made by the IP addresses assigned to the gateways directing traffic to the subnets. Here’s a brief overview of what they are and how they behave within the constraints of an AWS-based VPC.
VPC Subnet - Private IP Addresses
Private IP addresses are fundamental to network architecture, especially in large organizations. Unlike public IP addresses, which are globally unique and can be accessed over the internet, private IP addresses are used within a local network. They are not routable on the global internet. This makes them ideal for internal communications, such as a corporate LAN, within a private network. In most scenarios, these IP addresses follow specific ranges defined by the Internet Assigned Numbers Authority (IANA). For example, IP addresses starting with 10.x.x.x, 172.16.x.x - 172.31.x.x, and 192.168.x.x are universally recognized as private IP ranges. IP addresses play a critical role in the efficient, secure, and cost-effective management of internal networks. Their implementation, coupled with technologies like DHCP, DNS, and NAT, forms the backbone of modern networking infrastructures in both corporate and domestic settings.
VPC Subnet - Public IP Addresses
Public IP addresses are crucial in cloud computing and internet communication. These addresses are unique across the entire internet and are essential for sending and receiving data to and from instances in the cloud. Unlike private IP addresses, which are used within a local network, public IPs are used for external communications over the Internet. When you launch a new instance (a virtual server) in cloud platforms like AWS, it is often assigned a public IP address. This address is part of a pool of IPs owned by the cloud provider. The public IP ensures your instance can communicate online with other instances and services. For example, if you're hosting a website on an AWS instance, the public IP address allows internet users to access your site. The dynamic nature of these IPs in cloud environments and features like Elastic IPs provide flexibility and challenges in network management.
VPC Subnet - Elastic IP Addresses
Elastic IP addresses are critical in cloud computing platforms like AWS, designed to provide users with static, persistent public IP addresses. These addresses differ from the typical dynamic public IPs that change upon restarting or stopping instances. Elastic IPs are particularly useful when a constant public IP address is crucial for the continuity and reliability of services hosted on cloud instances. Their proper management and utilization are key to maintaining cost-effective and secure cloud infrastructure. Understanding the nuances of Elastic IPs allows cloud users to optimize their network architecture for resilience, scalability, and operational efficiency.
VPC / Networking Concepts - NAT Devices
Network Adress Translation, or NAT, is a networking concept that converts an IP address into another. The idea is that NAT devices will receive packets from a private (or any other for that matter) subnet and redirect them as if they were coming from a different IP address. Note that when we say “NAT devices,” we primarily mean software. In other words, even though NAT will typically happen “on hardware” via a router or switch, the idea is that the packets are changed on the 3rd layer of the OSI Model.
How NAT Functions
Outbound Traffic (Source NAT): When a device within a private network sends data to the internet, the NAT device translates the private IP address of the source to its own public IP address. This translation is recorded in a NAT table so that returning data can be directed back to the correct device on the private network.
Inbound Traffic (Destination NAT): For incoming data, the NAT device refers to its NAT table to determine the private IP address to which the data should be forwarded.
In the context of AWS VPCs, NAT is used to route traffic from within private subnets to the internet and vice versa.
Conclusion on AWS VPC Services
AWS Virtual Private Cloud (VPC) is a service that allows you to create a logically isolated section of the AWS cloud where you can launch AWS resources in a virtual network that you define. This service offers several key features and benefits:
- Customizable Network Configuration: You have complete control over your virtual networking environment. This includes the selection of your own IP address range, the creation of subnets, and the configuration of route tables and network gateways.
- Enhanced Security: VPC provides advanced security features such as security groups and network access control lists (ACLs) to enable inbound and outbound filtering at the instance and subnet level. Additionally, you can create a Hardware Virtual Private Network (VPN) connection between your corporate datacenter and your VPC to leverage the AWS cloud as an extension of your corporate network.
- Subnet Flexibility: Within a VPC, you can create multiple subnets, each of which can be isolated and exposed to the Internet in different ways. This allows for granular control over how internal and external resources access different parts of your infrastructure.
- Internet Gateway and NAT: You can use an Internet Gateway to provide access to the internet from your VPC. In scenarios where you want to allow outbound internet access for resources in a private subnet, you can utilize NAT (Network Address Translation) gateways or instances.
- Elastic IP Addresses: AWS VPC supports Elastic IP addresses, which are static IPv4 addresses designed for dynamic cloud computing.
- Integration with AWS Services: VPCs are integrated with many AWS services like Amazon EC2, RDS, and Lambda, providing secure and easy access to these resources within a virtual network.
- VPN Support: The VPC offers the option to connect your VPC to remote networks using VPN connections, which are secured and encrypted.
- Endpoint Services: AWS VPC allows the creation of VPC endpoints to privately connect your VPC to supported AWS services and VPC endpoint services powered by PrivateLink without requiring an internet gateway, NAT device, VPN connection, or AWS Direct Connect connection.
- Flow Logs: VPC Flow Logs enable you to capture information about the IP traffic going to and from network interfaces in your VPC, which is crucial for network monitoring and troubleshooting.
- Scalability and Elasticity: Just like other AWS services, VPC is highly scalable and elastic, allowing you to quickly adjust to changes in network infrastructure requirements.
VPCs are commonly used in microservices and architectures that require segmentation between services, regions, etc. There are many ways to deploy code onto VPCs on AWS; one of those methods is through GitHub Actions.